Rust for Node.js developers - Part 3 - Crates, Modules and the web
Rust for Node.js developers - Part 3 - Crates, Modules and the web
This post is part of a series. Links to all parts below.
- Part 1 - Introduction to Rust
- Part 2 - Can I borrow that?
- Part 3 - Crates, Modules and the web
Rust on the web
So far in this series we have learned the basic data types available in Rust and how to use them, we have learned about ownership and borrowing. We have built 2 iterations of a todo-list, but we have done all of this without leaving the command line.
If your main language is Javascript your main platform is pretty likely to be the web, and you may have impatiently been asking yourself how to write Rust for the web when reading the previous parts. That is a great question, and something the Rust community spends quite a lot of time thinking about. So much so, that there is an excellent web site dedicated to it Are we web yet?.
The idea of being able to compile Rust for any popular platform, including front-end web, mobile app environments, embedded systems is strong in the community, and improving the cross compile story is actively being worked on. To quote this excellent and very exciting recent post on the official rust-lang blog:
Rust has already been ported to Emscripten (at least twice), but the code has not yet fully landed. This summer it’s happening though: Rust + Emscripten. Rust on the Web. Rust everywhere.
As excited as I am about that, let's stick to a server rendered Rust app in this post. :)
Adding dependencies
It's soon time to add our first dependencies in this series, but first use the hopefully familiar cargo new command to scaffold a new project for us:
cargo new hello-server --bin
The dependency we will install is called nickel and is in it's own words:
An expressjs inspired web framework for Rust
There is no Cargo command to install local dependencies for a project. The cargo install command will only install global binaries. But there is an external crate, cargo-add that lets us add dependencies from the command line.
So to add nickel, we'll first install cargo-add and then use it to install nickel.
cargo install cargo-add
cargo add nickel --version 0.8.1
0.8.1 is the version we'll use in this post, if you want to look up the latest version you can run
cargo search nickel.
If we check our Cargo.toml file we should now see this (you could of course also just add it manually):
...
[dependencies]
nickel = "0.8.1"
This is very similar to the dependencies you would have in a package.json file, where you might have something like:
...
"dependencies": {
    "express": "4.14.0",
    ...
* just like for npm dependencies is a wildcard meaning any version (the latest).
The rules about specifying versions are mostly the same as in package.json, with a few exceptions. In npm land a full semver version 1.2.3 means that exact version and only that exact version. Cargo will instead read it as ^1.2.3 (any "compatible" version < 2.0.0). Wildcards *, carets ^, and tildes ~ work the same as in npm.
If you need a recap of how they work here's a quick demonstration from the Cargo docs of how versions are interpreted:
^1.2.3 := >=1.2.3 <2.0.0
^1.2 := >=1.2.0 <2.0.0
^1 := >=1.0.0 <2.0.0
^0.2.3 := >=0.2.3 <0.3.0
^0.0.3 := >=0.0.3 <0.0.4
^0.0 := >=0.0.0 <0.1.0
^0 := >=0.0.0 <1.0.0
~1.2.3 := >=1.2.3 <1.3.0
~1.2 := >=1.2.0 <1.3.0
~1 := >=1.0.0 <2.0.0
If you did mean to add an exact version you would use = 1.2.3. This is usually not necessary though since Cargo automatically generates a Cargo.lock for us, that locks down all the version of your dependencies (and their dependencies) to the versions that just got installed for you, these dependencies will not update automatically, you have to run cargo update to do that.
The same goes for anyone who clones your project (including Cargo.lock file), Cargo will build everything with the exact same versions you used.
If you are familiar with npm's shrinkwrap this is very similar behavior. :)
We are going to need two more dependencies before we are done, so we might as well add them now:
cargo add handlebars --version 0.18.1
cargo add rustc-serialize --version 0.3.19
OK! Time to write our first Rust server example!
Nickel "Hello world!"
So... we have a Rust library that is trying to be close to express, how does that look?
Let's add a Hello world example to the src/main.rs file that cargo created for us.
extern crate nickel;
use nickel::{Nickel, HttpRouter, Request, Response, MiddlewareResult};

fn hello_world<'mw>(_req: &mut Request, res: Response<'mw>) -> MiddlewareResult<'mw> {
    res.send("Hello World!")
}

fn main() {
    let mut app = Nickel::new();
    app.get("/", hello_world);
    app.listen("0.0.0.0:3000");
}
Now if you run this with:
cargo run
Cargo will download and install your dependencies, build and then run your project. When it is done you should be able to open http://localhost:3000 in your browser and see a nice Hello world! message.
Comparing Nickel and Express
Let's write the same code in Node/Express and look at the differences:
const express = require('express');

function helloWorld(req, res) {
  res.send('Hello World!');
}

const app = express();
app.get('/', helloWorld);
app.listen(3000, '0.0.0.0');
There are 2 key differences, let's start with the non scary one. Where in Node you just use express as:
const express = require('express');
In Rust we have 2 steps:
extern crate nickel;
use nickel::{Nickel, HttpRouter, Request, Response, MiddlewareResult};
First we declare that we have an installed external crate to look in, and then we state what parts of that we are going to use in this file.
This use syntax is close to es6 import syntax. If we imagined that nickel was an npm module, the es6 way to write the above Rust code would be:
import {Nickel, HttpRouter, Request, Response, MiddlewareResult} from 'nickel';
The next difference is the hello world function:
function helloWorld(req, res) {
  res.send('Hello World!');
}
vs.
fn hello_world<'mw>(_req: &mut Request, res: Response<'mw>) -> MiddlewareResult<'mw> {
    res.send("Hello World!")
}
Both are functions that take a request and response "object" (in Rust these are structs), and sends a hello world response, but the Rust function probably looks slightly complex.
That Rust functions must declare the type of what goes into and out of a function we have already covered. But what are all these <'mw> about? These are explicit lifetimes, we will cover them in more detail in a future post, but what this code is basiclly saying is that the hello_world function has a lifetime (that is named mw). That the incoming res: Response<'mw> and the result MiddlewareResult<'mw> must both live longer than the lifetime of the function.
If that makes sense to you, great! If not, don't worry too much about it. We are going to replace this hello_world function with a macro that the Nickel crate provides for us. This way of returning a result is so common that there is a shorthand for it.
#[macro_use] extern crate nickel;
use nickel::{Nickel, HttpRouter};

fn main() {
    let mut app = Nickel::new();
    app.get("/", middleware!("Hello World!"));
    app.listen("0.0.0.0:3000");
}
We will be using this middleware! macro from now on, I just wanted you to see that what is actually passed to our nickel app is a function very much like on we would write for an express app, just think of the macro as a shorthand that will write that rather verbose function code for us.
#[macro_use] is necessary to tell the compiler we want to use macros from an external crate.
Modularizing our app
As shocking as this may be to you, the web app we are going to build is a todo app! 😲
We will reuse almost all of the code from the previous example, part 2 code here, splitting the logic up in modules. If you want to join in on the migration fun you should copy that code to your src/main.rs.
I won't shoot for some grand complicated app structure for this tiny app, but instead simply break out todo and store modules from main, so that main just uses the data types and structures we have.
Start by creating a new file src/todo.rs and we'll start cutting the todo specific code out of main.
// Lines 30-48
#[derive(Clone, Debug)]
struct Todo {
    id: i16,
    title: String,
    completed: bool,
    deleted: bool,
}

// Create a convenient Todo::new(id, title) method
impl Todo {
    pub fn new(id: i16, title: String) -> Todo {
        Todo {
            id: id,
            title: title,
            completed: false,
            deleted: false,
        }
    }
}

// Line 60-67
// mark_done from the previous example becomes Toggle to align with the Redux example
// otherwise functionality is the same
#[derive(Clone, Debug)]
enum TodoAction {
    Add(String),
    Toggle(i16),
    Remove(i16),
}

// Line 77-80
// Helper function for getting a mutable todo from a vector by todo_id
fn get_mut_todo(todos: &mut Vec<Todo>, todo_id: i16) -> Option<&mut Todo> {
    todos.iter_mut().find(|todo|todo.id == todo_id)
}

// Line 93-123
// Our todo reducer, takes in state (todo list) and returns a new/cloned version
// after applying the action (is applicable)
fn todo_reducer(state: &Vec<Todo>, action: &Action) -> Vec<Todo> {
    let mut new_state: Vec<Todo> = state.clone();

    // First we make sure it's a `Todos` action, otherwise return clone of incoming state
    match *action {
        Todos(ref todo_action) => match *todo_action {
            // Pretty simple from here on, check the type of Todos enum type
            // If Add push a new item, and if `Toggle` or `Remove` use our get_mut_todo
            // helper function and then change a property on the todo
            Add(ref title) => {
                let new_id = new_state.len() as i16 + 1;
                new_state.push(Todo::new(new_id, title.to_string()))
            },
            Toggle(todo_id) => {
                if let Some(todo) = get_mut_todo(&mut new_state, todo_id) {
                    if todo.completed { todo.completed = false; } else { todo.completed = true; }
                }
            },
            Remove(todo_id) => {
                if let Some(todo) = get_mut_todo(&mut new_state, todo_id) {
                    todo.deleted = true;
                }
            },
        },
        // If it's not a Todos action change nothing
        _ => (),
    }
    return new_state;
}
Ok, that should make our main.rs file a little lighter, but if you try to cargo run the project now it will of course fail miserably.
Before we fix the problems, let's create an src/store.rs file. With the todo-code cut out we should now have a block of code that looks like this in main, ready to cut out.
// Ripping off the canonical Redux todo example we'll add a
// visibility filter to our state except for the todos we already had
#[derive(Clone, Debug)]
struct State {
    todos: Vec<Todo>,
    visibility_filter: VisibilityFilter
}

// By implementing a struct we are creating something very much like
// a class, we can attach methods to it refering to &self` or `&mut self`
impl State {
    // This gives us a quick way to initialize a default state with State::default()
    pub fn default() -> State {
        State {
            todos: Vec::new(),
            visibility_filter: VisibilityFilter::ShowAll,
        }
    }
}

// Rust has enums, so the enum type can replace the "type" property of Redux objects
// The enums will replace `action creators` too since Todos(Add("Todo item".to_string()))
// is pretty clear
#[derive(Clone, Debug)]
enum Action {
    Todos(TodoAction),
    Visibility(VisibilityFilter),
}

// Our 3 visibility states
#[derive(Clone, Debug)]
enum VisibilityFilter {
    ShowActive,
    ShowAll,
    ShowCompleted,
}

// Our main reducer, returns a new State with the results of the child-reducers
// No combineReducers is implemented here, so it calls the child reducers
// by function name
fn reducer(state: &State, action: Action) -> State {
    // Always return a new state
    State {
        todos: todo_reducer(&state.todos, &action),
        visibility_filter: visibility_reducer(&state.visibility_filter, &action),
    }
}

// Very simple reducer since the action will either be a VisibilityFilter, in which
// case we will return that, otherwise just return the incoming state
fn visibility_reducer(state: &VisibilityFilter, action: &Action) -> VisibilityFilter {
    match *action {
        Visibility(ref vis_action) => vis_action.clone(),
        _ => state.clone(),
    }
}

// Redux store implementation
struct Store {
    state: State,
    listeners: Vec<fn(&State)>,
    reducer: fn(&State, Action) -> State,
}

impl Store {
    // Takes a reducer function, we skip the initial_state and optional arguments
    // TO keep it simple, State::default() from earlier is our initial_state implementation
    fn create_store(reducer: fn(&State, Action) -> State) -> Store {
        Store {
            state: State::default(),
            listeners: Vec::new(),
            reducer: reducer,
        }
    }

    // Pushes a listener that will be called for any state change
    fn subscribe(&mut self, listener: fn(&State)) {
        self.listeners.push(listener);
    }

    // Simply returns the state
    #[allow(dead_code)]
    fn get_state(&self) -> &State {
        &self.state
    }

    // Called for every new action, calls the reducer to update the state
    // and then calls every listener
    fn dispatch(&mut self, action: Action) {
        self.state = (self.reducer)(&self.state, action);
        for listener in &self.listeners {
            listener(&self.state)
        }
    }
}
With that code moved to store, we should now have a main with only some "print to terminal" helper functions and the input command parsing and action dispatching. Let's make this code work again.
Rust modules 101
Rust modules can be declared inline like this:
mod hello {
    pub fn world() {
        println!("Hello world");
    }
}

fn main() {
    hello::world(); // prints "Hello world"
}
This is usually not very practical, since you want to split up your project in files and folder for organizational purposes.
This is a more common use case:
src/hello.rs
pub fn world() {
    println!("Hello world!");
}
src/main.rs
mod hello;
use hello::world; // Let's you use hello::world() as just world()
use hello::{world}; // Another use syntax for multiple (comma separated) items
use hello::*; // Wildcards works for using everything directly under hello

fn main() {
    world(); // prints "Hello world!"
}
An important thing to note is the keyword pub in pub fn world(). By default everything in a Rust module is private, and usable only within the module, anything you want to expose to the ourside world needs a pub in front of it. In structs individual fields are private by default too, even if the struct is public, so each field needs to be specifically declared pub to be public.
Next up is file structure, when we declare the module hello here, Rust will follow a very simple convention for finding the file to import by looking for either hello.rs or hello/mod.rs starting from the current directory.
It's a very light-weight and no nonsense system that I really like, I can decide on a case by case basis if I want to add a folder for a module or just a single file and it's a very easy convention to remember.
I usually only put modules in folders when I want them to have submodules:
src/main.rs
mod hello;
use hello::earth::earth; // imports the earth function from the hello submodule earth

fn main() {
    earth();
}
src/hello/mod.rs
pub mod earth;

pub fn world() {
    println!("Hello world!");
}
src/hello/earth.rs
use hello::world;

pub fn earth() {
    world();
    println!("More specifically, Earth.");
}
So main declares the module hello, which in turn declares a submodule earth, that can quite easily use items from it's parent hello module. And the output of this is:
Hello world
More specifically, Earth.
Ok, those were some pretty silly module examples. Let's apply this knowledge to the mess we just made out of our todo list project.
First let's add our modules to main, and then change the use statements that used to refer to local items to now include the respective modules at the start:
src/main.rs
mod todo;
mod store;

// Lets us type `Add("Todo item".to_string())` instead of `TodoAction::Add("Todo item".to_string())`
use todo::TodoAction::{ Add, Remove, Toggle };
// Same with the Action enum and VisibilityFilter, Action::*; would work too, but this way we list what we use
use store::Action::{ Todos, Visibility };
use store::VisibilityFilter:: { ShowActive, ShowAll, ShowCompleted };
use todo::{Todo};
use store::{Store, State, reducer};
Next up let's make stuff public in our todo, and make sure to add use statements for the things we need there:
src/todo.rs
use store::{ Action };
use store::Action::{ Todos };
use todo::TodoAction::{ Add, Toggle, Remove };
#[derive(Clone, Debug)]
pub struct Todo {
    pub id: i16,
    pub title: String,
    pub completed: bool,
    pub deleted: bool,
}
impl Todo {
    pub fn new(id: i16, title: String) -> Todo {
        Todo {
            id: id,
            title: title,
            completed: false,
            deleted: false,
        }
    }
}

// mark_done from the previous example becomes Toggle to align with the Redux example
// otherwise functionality is the same
#[derive(Clone, Debug)]
pub enum TodoAction {
    Add(String),
    Toggle(i16),
    Remove(i16),
}

// Helper function for getting a mutable todo from a vector by todo_id
pub fn get_mut_todo(todos: &mut Vec<Todo>, todo_id: i16) -> Option<&mut Todo> {
    todos.iter_mut().find(|todo|todo.id == todo_id)
}

// Our todo reducer, takes in state (todo list) and returns a new/cloned version
// after applying the action (is applicable)
pub fn todo_reducer(state: &Vec<Todo>, action: &Action) -> Vec<Todo> {
    let mut new_state: Vec<Todo> = state.clone();

    // First we make sure it's a `Todos` action, otherwise return clone of incoming state
    match *action {
        Todos(ref todo_action) => match *todo_action {
            // Pretty simple from here on, check the type of Todos enum type
            // If Add push a new item, and if `Toggle` or `Remove` use our get_mut_todo
            // helper function and then change a property on the todo
            Add(ref title) => {
                let new_id = new_state.len() as i16 + 1;
                new_state.push(Todo::new(new_id, title.to_string()))
            },
            Toggle(todo_id) => {
                if let Some(todo) = get_mut_todo(&mut new_state, todo_id) {
                    if todo.completed { todo.completed = false; } else { todo.completed = true; }
                }
            },
            Remove(todo_id) => {
                if let Some(todo) = get_mut_todo(&mut new_state, todo_id) {
                    todo.deleted = true;
                }
            },
        },
        // If it's not a Todos action change nothing
        _ => (),
    }
    return new_state;
}
And do the same to store
src/store.rs
use store::Action::{ Visibility };
use todo::{ Todo, TodoAction, todo_reducer };

// Ripping off the canonical Redux todo example we'll add a
// visibility filter to our state except for the todos we already had
#[derive(Clone, Debug)]
pub struct State {
    pub todos: Vec<Todo>,
    pub visibility_filter: VisibilityFilter
}

// By implementing a struct we are creating something very much like
// a class, we can attach methods to it refering to &self` or `&mut self`
impl State {
    // This gives us a quick way to initialize a default state with State::default()
    pub fn default() -> State {
        State {
            todos: Vec::new(),
            visibility_filter: VisibilityFilter::ShowAll,
        }
    }
}

// Rust has enums, so the enum type can replace the "type" property of Redux objects
// The enums will replace `action creators` too since Todos(Add("Todo item".to_string()))
// is pretty clear
#[derive(Clone, Debug)]
pub enum Action {
    Todos(TodoAction),
    Visibility(VisibilityFilter),
}

// Our 3 visibility states
#[derive(Clone, Debug)]
pub enum VisibilityFilter {
    ShowActive,
    ShowAll,
    ShowCompleted,
}

// Our main reducer, returns a new State with the results of the child-reducers
// No combineReducers is implemented here, so it calls the child reducers
// by function name
pub fn reducer(state: &State, action: Action) -> State {
    // Always return a new state
    State {
        todos: todo_reducer(&state.todos, &action),
        visibility_filter: visibility_reducer(&state.visibility_filter, &action),
    }
}

// Very simple reducer since the action will either be a VisibilityFilter, in which
// case we will return that, otherwise just return the incoming state
fn visibility_reducer(state: &VisibilityFilter, action: &Action) -> VisibilityFilter {
    match *action {
        Visibility(ref vis_action) => vis_action.clone(),
        _ => state.clone(),
    }
}

// Redux store implementation
pub struct Store {
    state: State,
    listeners: Vec<fn(&State)>,
    reducer: fn(&State, Action) -> State,
}

impl Store {
    // Takes a reducer function, we skip the initial_state and optional arguments
    // TO keep it simple, State::default() from earlier is our initial_state implementation
    pub fn create_store(reducer: fn(&State, Action) -> State) -> Store {
        Store {
            state: State::default(),
            listeners: Vec::new(),
            reducer: reducer,
        }
    }

    // Pushes a listener that will be called for any state change
    pub fn subscribe(&mut self, listener: fn(&State)) {
        self.listeners.push(listener);
    }

    // Simply returns the state
    #[allow(dead_code)]
    pub fn get_state(&self) -> &State {
        &self.state
    }

    // Called for every new action, calls the reducer to update the state
    // and then calls every listener
    pub fn dispatch(&mut self, action: Action) {
        self.state = (self.reducer)(&self.state, action);
        for listener in &self.listeners {
            listener(&self.state)
        }
    }
}
And with this the terminal todo app should compile and work with a simple cargo run.
As you can see it was mostly a fairly painless process of adding pub in front of the things that other parts of your program was using. And if you didn't follow my instructions the compiler would be complaining about trying to use undeclared things until you had fixed them all yourself.
One common pitfall if you are coming from node is that you try to declare modules with mod whereever you want to use them. One important difference in Rust is that the todo module here isn't actually declared in todo.rs, it's declared in main.rs when it uses mod todo;, and a module can only be declared once.
Once the todo module is declared in main it is accessible to the whole program with a simple use todo;.
Building a server rendered todo list
Now that the stuff we want to keep is safely encapsulated in their own modules, and we have tested that it all still works, we can delete most of main.rs, leaving only this:
use std::io;
mod todo;
mod store;

// Lets us type `Add("Todo item".to_string())` instead of `TodoAction::Add("Todo item".to_string())`
use todo::TodoAction::{ Add, Remove, Toggle };
// Same with the Action enum and VisibilityFilter, Action::*; would work too, but this way we list what we use
use store::Action::{ Todos, Visibility };
use store::VisibilityFilter:: { ShowActive, ShowAll, ShowCompleted };
use todo::{Todo};
use store::{Store, State, reducer};

fn main() {
    // Let's create our store and subscribe with print_todos so every update is printed
    let mut store = Store::create_store(reducer);


}
This code should compile, but doesn't do much. If we want our todo list on the web we should be rendering HTML, and the plan is to use handlebars as our templating language. We have already imported handlebars as a dependency, and handlebars-rust is a fairly complete handlebars implementation.
We want the end result to look like this:
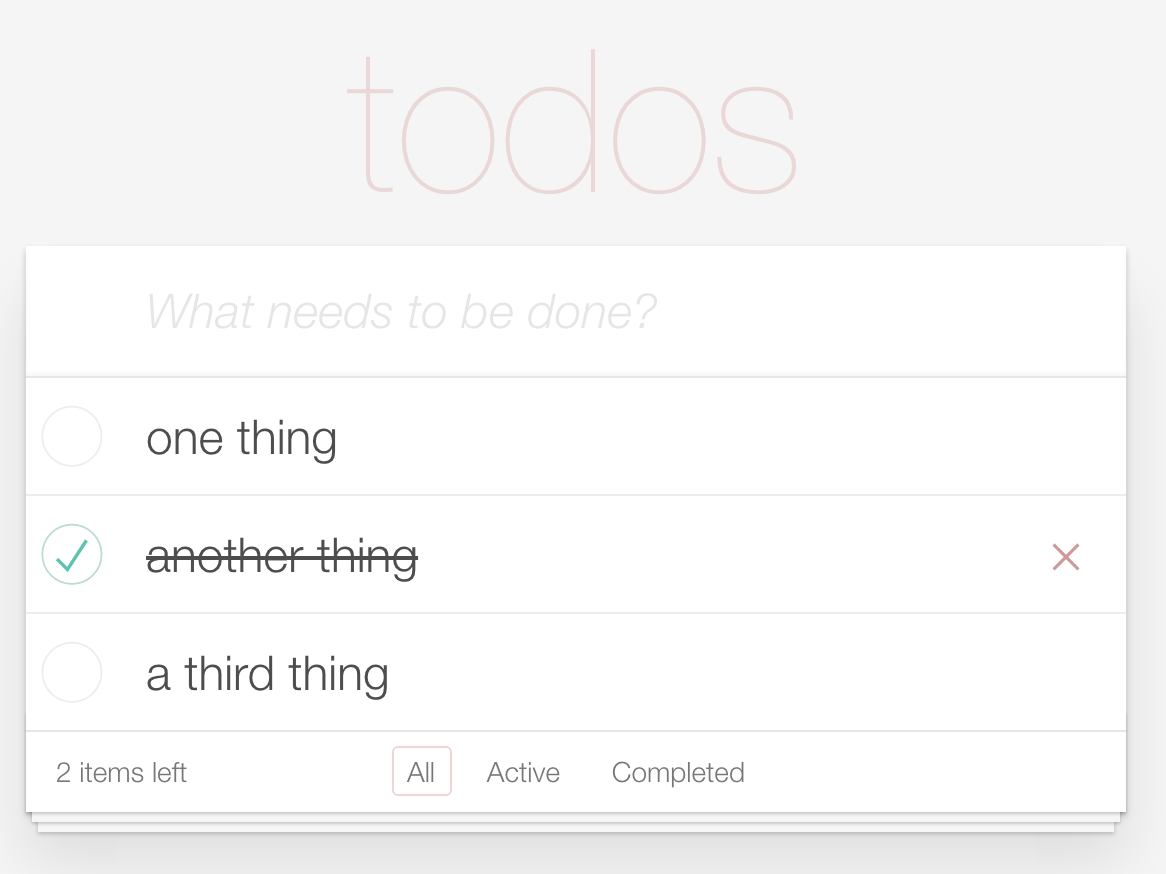
Fortunately, this is the standard TodoMVC look, both the CSS and the HTML structure to use is predefined, so we can focus on rendering the data from our Store.
With that said let's create a new file src/todos.tpl:
<!DOCTYPE html>
<html>
  <head>
    <meta charset="utf-8">
    <title>Nickel Todo</title>
    <link rel="stylesheet" href="http://todomvc.com/examples/react/node_modules/todomvc-common/base.css">
    <link rel="stylesheet" href="http://todomvc.com/examples/react/node_modules/todomvc-app-css/index.css">
    <style type="text/css">
    label a {
      color: #4d4d4d;
      text-decoration: none;
    }
    </style>
    <script>
      document.addEventListener('click', function clickHandler(e) {
        if (e.target && e.target.dataset && e.target.dataset.id) {
          window.location.href = '/' + e.target.dataset.action + '/' + e.target.dataset.id;
        }
      });
    </script>
  </head>
  <body>
    <section class="todoapp">
      <header class="header">
        <h1>todos</h1>
        <form class="add-todo" action="/" method="post">
          <input class="new-todo" placeholder="What needs to be done?" name="todo">
        </form>
      </header>
      <section class="main">
        <ul class="todo-list">
          {{#each todos}}
          {{#unless deleted}}
          <li{{#if completed}} class="completed"{{/if}} data-id={{id}}>
            <div class="view">
              <input class="toggle" type="checkbox"{{#if completed}} checked="checked"{{/if}} data-id={{id}} data-action="toggle">
              <label><a href="/toggle/{{id}}">{{title}}</a></label>
              <button class="destroy" data-id={{id}} data-action="remove"></button>
            </div>
          </li>
          {{/unless}}
          {{/each}}
        </ul>
      </section>

      <footer class="footer">
        <span class="todo-count">
          <strong>0 items left</strong>
        </span>
        <ul class="filters">
          <li>
            <a href="/show/all">All</a>
          </li>
          <span> </span>
          <li>
            <a href="/show/active">Active</a>
          </li>
          <span> </span>
          <li>
            <a href="/show/completed">Completed</a>
          </li>
        </ul>
      </footer>
    </section>

  </body>
</html>
Handlebars is a very common templating language, it lets us do nice things like {{#each todos}} to iterate through each todo in our app state, and within the each block we can access fields from the currently iterated todo as {{id}} and {{title}}.
We can also do things like {{#if completed}} or {{#unless deleted}} to conditionally print render of html.
This HTML isn't all that interesting in itself, but it paints a picture of how the app will work. New todos will be posted through a normal html form as POST. The rest of our actions, toggling or removing todos, and changing the visibility filter will be done through normal GET links.
Most are normal anchor tag links, but where there is a checkbox or X button to remove a todo I cheat a bit and let javascript change the url.
Rendering handlebar templates
With the template-file in place let's create a function to render handlebar templates for us. Because there will be more template related helper functions we will create a new module for this:
src/template.rs
use rustc_serialize::json::ToJson;
use nickel::{Response, MiddlewareResult};
use std::path::Path;
use handlebars::{Handlebars, Renderable, RenderError, RenderContext, Helper, Context, JsonRender};

pub fn render<'mw, T:ToJson>(res: Response<'mw>, path: &str, data: &T) -> MiddlewareResult<'mw> {
    let mut handlebars = Handlebars::new();

    handlebars.register_template_file("template", &Path::new(path)).ok().unwrap();
    let result = handlebars.render("template", data).ok().unwrap();

    res.send(result)
}
Our render function will take the nickel Response object as the first argument, the path to a template file as the second argument, and a borrowed reference to the data to render as it's third argument.
Handlebars register_template_file first lets us name the template we are registering, I named it "template" because I'm very imaginative... The second thing it wants is the path to the template file, it wants it as a Path from the Rust standard library, easy!
Next we render the template and pass it onto Nickel's res.send() so that it's rendered for the user. This .ok().unwrap(); is fairly common (especially in example code ;) ). Because handlebars.render returns a Rust Result, .ok() grabs the value of the Result as an Option, and then we call .unwrap() on the option to get it's value. It makes for quick and easy code, but doesn't really handle any errors that may occur.
You may notice something that looks a little odd in the function declaration, there's a T:ToJson in the pub fn render<'mw, T:ToJson>, and our data argument has no type declared other than T, data: &T. This is Rust's syntax for generics, which you may never have encountered if you've worked exclusively with loosely typed languages.
Since data here can be anything, an array, a vector, a single string, etc. and Rust needs everything to be typed, we can assign it a generic type. Naming it T for Type is a convention in Rust, I could name it something more descriptive as TemplateData if I wanted to. The compiler will ensure that T is consistently the same type whereever T is being used.
Generics and Traits work very well together, by declaring the type T as T:ToJson we are saying that T can be anything, as long as it's something that implements the ToJson trait. This is a requirement from handlebars-rust to be able to work with the data.
Handlebars, coming from javascript, is very loose and easy with types and assumes types compatible with the (very few) data types available in javascript. Rust is strict about types and has a very rich type system, so to get around a lot of the problems that would cause, handlebars-rust works by converting the data passed to it to json, or rather Json coming from the rust-serialize crate.
This is a pretty clever way to do it, since the json functionality from rust-serialize takes care of all the heavy lifting in turning Rust data into javascript compatible data.
It does create a little extra work for us though, since it means that our State struct now has to implement the ToJson trait. There are 3 things we need to do to make this work:
-
Add
use rustc_serialize::json::{self, Json, ToJson};to the top ofsrc/store.rs. -
Add the implementation of ToJson for
State, add this under the struct definition.
impl ToJson for State {
    fn to_json(&self) -> Json {
        Json::from_str( &json::encode(&self).unwrap() ).unwrap()
    }
}
- Let's find the definition of
StateandVisibilityFilterinsrc/store.rsandTodoinsrc/todo.rsand add 2 new derivable traits to them,RustcEncodableandRustcDecodableso we get#[derive(Clone, Debug, RustcEncodable, RustcDecodable)].
Alright, we should now be able to use our template module to render our todo list:
src/main.rs
#[macro_use] extern crate nickel;
extern crate rustc_serialize;
extern crate handlebars;

use nickel::{Nickel, HttpRouter};
use std::io;
mod todo;
mod store;
mod template;

// Lets us type `Add("Todo item".to_string())` instead of `TodoAction::Add("Todo item".to_string())`
use todo::TodoAction::{ Add, Remove, Toggle };
// Same with the Action enum and VisibilityFilter, Action::*; would work too, but this way we list what we use
use store::Action::{ Todos, Visibility };
use store::VisibilityFilter:: { ShowActive, ShowAll, ShowCompleted };
use todo::{Todo};
use store::{Store, State, reducer};
use template::render;

fn main() {
    // Let's create our store and subscribe with print_todos so every update is printed
    let mut store = Store::create_store(reducer);

    // Add some todos so we've got something to render
    store.dispatch( Todos( Add("one thing".to_string()) ) );
    store.dispatch( Todos( Add("another thing".to_string()) ) );

    let mut server = Nickel::new();
    server.get("/", middleware! { |_req, res|
        return render(res, "./src/todos.tpl", store.get_state())
    });
    server.listen("0.0.0.0:3000");
}
You should now be able to cargo run this and open http://localhost:3000 in your browser.
We can now render a todo list, but not change or add anything. Let's fix that:
toggling and removing todos
Add a new server.get block under the one we've already got. The logic should be partly familiar. Like with the terminal commands we still have to convert text into actions and params for our code.
We can access the :id part from the url through _req.param("id").unwrap(), and next we convert it to an integer.
Next we use the parsed num either as a toggle or remove action (or a noop if :action is anything else).
And finally we render the updated list with our custom render function.
    server.get("/:action/:id", middleware! { |_req, res|
        // We try to parse the id param to an int, this works for the
        // toggle and remove actions
        if let Ok(num) = _req.param("id").unwrap().parse::<i16>() {
            match _req.param("action").unwrap() {
                "toggle" => {
                    store.dispatch( Todos( Toggle(num) ) )
                },

                "remove" => store.dispatch( Todos( Remove(num) ) ),
                _ => (),
            }
        }

        // And render the now updated todo list
        return render(res, "./src/todos.tpl", store.get_state())
    });
No we should be able to toggle and remove todos... but no, this doesn't compile!
error: capture of moved value: `store`
`store` moved into closure environment here because it has type `store::Store`, which is non-copyable
So, Nickel actually runs the code from our middleware! macros in threads, and Rust being a safe language very nicely moves ownership of store to the first thread that uses it so there can be no unsafe access.
To safely share data between threads Rust offers a number of wrappers. One is Arc, atomic reference counting. Calling .clone() on an Arc container gives you an immutable reference to the data inside, and Arc keeps track of how many references are in use at any time.
To get a mutable reference, which we will need to dispatch actions that modify our state, we first wrap our state in a Mutex wrapper. You call .lock() instead of clone on a Mutex, which tries to lock access to the data in the wrapper, and return an Option that will contain the data if the lock was successful, and a None if it failed (because there was already a lock in place).
We will do the least amount of work possible here to make this work, not worrying about handling errors. Let's change our main function so it compiles:
use std::sync::{Arc, Mutex};

fn main() {
    let mut server = Nickel::new();

    // Create our todo list store
    let mut store = Store::create_store(reducer);

    // Add some todos so we've got something to render
    store.dispatch( Todos( Add("one thing".to_string()) ) );
    store.dispatch( Todos( Add("another thing".to_string()) ) );

    // Put the store in a container that will let us
    // safely use it in multi-threaded environment
    let store_container = Arc::new( Mutex::new(store) );

    // Every clone() of our container is counted
    // so that when the last clone goes out of scope
    // the container can be deallocated
    let store = store_container.clone();

    // At the / path let's just render our current todo list
    server.get("/", middleware! { |_req, res|
        // We get our store from the container by locking it
        // from other threads.
        let store = store.lock().unwrap();

        // Render from nickel_mustache takes the
        // nickel Result struct, a path to a mustache
        // template, and the data to use
        return render(res, "./src/todos.tpl", store.get_state())
        // And here the lock is released..
    });

    // Let's clone it again for the next closure
    let store = store_container.clone();

    // This time we look for requests like /toggle/1
    server.get("/:action/:id", middleware! { |_req, res|
        // We will dispatch an action on our store so we
        // get a mutable reference
        let mut store = store.lock().unwrap();

        // We try to parse the id param to an int, this works for the
        // toggle and remove actions
        if let Ok(num) = _req.param("id").unwrap().parse::<i16>() {
            match _req.param("action").unwrap() {
                "toggle" => {
                    store.dispatch( Todos( Toggle(num) ) )
                },

                "remove" => store.dispatch( Todos( Remove(num) ) ),
                _ => (),
            }
        }
        // And render the now updated todo list
        return render(res, "./src/todos.tpl", store.get_state())
    });

    server.listen("0.0.0.0:3000");
}
Toggling and removing todos work, yay!
adding todos
New todos are being posted by a form tag in the handlebars <form class="add-todo" action="/" method="post">. So we need to listen for post request and the name property of the input tag todo gives us the parameter name to look for.
    // Let's clone it again for the next closure
    let store = store_container.clone();

    server.post("/*", middleware! { |req, res|
        let mut store = store.lock().unwrap();
        let form_body = req.form_body().ok().unwrap();
        if let Some(new_todo) = form_body.get("todo") {
            if new_todo.len() > 0 {
                store.dispatch( Todos( Add(new_todo.to_string()) ) );
            }
        }

        return render(res, "./src/todos.tpl", store.get_state())
    });
server.post("/*" matches any post request. We get post parameters by getting the FormBody of the request, to be able to work with FormBody, we need to use this trait, so add it to our nickel use declaration:
use nickel::{Nickel, HttpRouter, FormBody};
Getting the text for the todo is as easy as calling .get("todo").We also check the length to be sure we don't add empty todos.
We can now add, toggle and remove todos. There are a few things missing though:
- We can not change the visibility filter.
- We do not filter the visible todos in any way (other than not showing removed todos).
- We have no logic to show which visibility filter is active.
- The count of todos left is hard coded to 0.
The first point is easy, just more of what we have been doing. Add an else clause to the if in the server.get("/:action/:id" block:
        if let Ok(num) = _req.param("id").unwrap().parse::<i16>() {
            match _req.param("action").unwrap() {
                "toggle" => {
                    store.dispatch( Todos( Toggle(num) ) )
                },

                "remove" => store.dispatch( Todos( Remove(num) ) ),
                _ => (),
            }
        } else {
        // Otherwise look for a show action
            match _req.param("action").unwrap() {
                "show" => {
                    match _req.param("id").unwrap() {
                        "all" => store.dispatch( Visibility( ShowAll ) ),
                        "active" => store.dispatch( Visibility( ShowActive ) ),
                        "completed" => store.dispatch( Visibility( ShowCompleted ) ),
                        _ => (),
                    }
                },
                _ => (),
            }
        }
Now you can click the visibility filter links at the bottom of the list, and it's set to our state, but we don't actually do anything with it.
custom helpers
Handlebars doesn't let us do something like {{#if visibility_filter == "active" && !completed}}, but what handlebars do have are custom helpers. So we are going to define a {{#filter_todo}} helper, that wraps the todo output and only shows the todo if it matches the current filter.
Here's how we define one:
src/template.rs
fn filter_todo(c: &Context, h: &Helper, ha: &Handlebars, rc: &mut RenderContext) -> Result<(), RenderError> {
    let active_filter = c.navigate(".", "visibility_filter").as_string().unwrap();
    let is_completed = c.navigate( rc.get_path(), "completed").as_boolean().unwrap();
    let show_todo: bool = match active_filter {
        "ShowAll" => true,
        "ShowCompleted" => is_completed,
        "ShowActive" => !is_completed,
        _ => false,
    };

    if show_todo {
        h.template().unwrap().render(c, ha, rc)
    } else {
        Ok(())
    }
}
And add this inside our render function, before rendering:
handlebars.register_helper("filter_todo", Box::new(filter_todo));
And in your template file add {{#filter_todo}} and {{/filter_todo}} inside your each block:
src/todos.tpl
...
      <section class="main">
        <ul class="todo-list">
          {{#each todos}}
          {{#unless deleted}}
          {{#filter_todo}}
          <li{{#if completed}} class="completed"{{/if}} data-id={{id}}>
            <div class="view">
              <input class="toggle" type="checkbox"{{#if completed}} checked="checked"{{/if}} data-id={{id}} data-action="toggle">
              <label><a href="/toggle/{{id}}">{{title}}</a></label>
              <button class="destroy" data-id={{id}} data-action="remove"></button>
            </div>
          </li>
          {{/filter_todo}}
          {{/unless}}
          {{/each}}
        </ul>
      </section>
...
Now the filters should actually work!
So what did we do? Well our filter function gets the access to the Context c from handlebars, which has a very useful .navigate() method.
let active_filter = c.navigate(".", "visibility_filter").as_string().unwrap();
We get the active filter by navigating from the root of our date, by passing "." as the first arg, and the name of the field as the second. This returns a Json result, that in turn has an .as_string() method that returns an Option that we can unwrap.
We get the completed field from the currently iterated todo in almost the same way:
let is_completed = c.navigate( rc.get_path(), "completed").as_boolean().unwrap();
Instead of "." for root, rc.get_path() (rc is the RenderContext) instead gets the current position in the data tree, which is inside currently iterated todo items, so it will have a completed field we can retrieve as a boolean.
Now that we have the data we need it's just a matter of a simple match statement to set show_todo to either true or false, and then based on that either render the block inside our helper, or do nothing (Return an Ok() result containing an empty tuple ()).
Worth noting is that the name we give it when registering the helper is the name we can use in our templates, the function name has nothing to do with it.
We'll add 2 more helpers to show the active filter, and an accurate count of unfinished todos.
fn is_selected_filter(c: &Context, h: &Helper, ha: &Handlebars, rc: &mut RenderContext) -> Result<(), RenderError> {
    let param = h.param(0).unwrap().value().as_string().unwrap();
    let active_filter = c.navigate(".", "visibility_filter").as_string().unwrap();
    let is_selected: bool = match active_filter {
        "ShowAll" => if param == "ShowAll" { true } else { false },
        "ShowCompleted" => if param == "ShowCompleted" { true } else { false },
        "ShowActive" => if param == "ShowActive" { true } else { false },
        _ => false,
    };
    if is_selected {
        h.template().unwrap().render(c, ha, rc)
    } else {
        Ok(())
    }
}

#[allow(unused_variables)]
fn active_count(c: &Context, h: &Helper, ha: &Handlebars, rc: &mut RenderContext) -> Result<(), RenderError> {
    let todos = c.navigate(".", "todos").as_array().unwrap();
    let count = todos
        .into_iter()
        .filter(|todo| {
            !todo.find("completed").unwrap().as_boolean().unwrap() &&
            !todo.find("deleted").unwrap().as_boolean().unwrap()
        })
        .count();

    let mut output = count.to_string();
    if count == 1 {
        output.push_str(" item left");
    } else {
        output.push_str(" items left");
    }

    rc.writer.write(output.as_bytes()).unwrap();
    Ok(())
}
The is_selected_filter will be used like this, so we conditionally set a selected class on the right filter link:
<a href="/show/all"{{#is_selected_filter "ShowAll"}} class="selected"{{/is_selected_filter}}>All</a>
The implementation is mostly a copy of filter_todo, with a key difference, it takes an argument, that we access in a slightly complex way.
let param = h.param(0).unwrap().value().as_string().unwrap();
Get the param with index 0, unwrap the Option returned, get the Json value from that, as a string, and unwrap that Option. 🙌
The active_count helper is a little more interesting, and will actually require us to add a new use statement:
use std::io::Write;
With this helper we don't just conditionally show something, we create, or write content to the RenderContext. active_count will simply be used like this:
{{#active_count}}{{/active_count}}
And print out n item(s) left.
It works by getting the list of todos from our state, iterating it and filtering out the todos that are deleted or completed. And finally .count() will return the count of the items left.
    let count = todos
        .into_iter()
        .filter(|todo| {
            !todo.find("completed").unwrap().as_boolean().unwrap() &&
            !todo.find("deleted").unwrap().as_boolean().unwrap()
        })
        .count();
Next we create the string to write:
    let mut output = count.to_string();
    if count == 1 {
        output.push_str(" item left");
    } else {
        output.push_str(" items left");
    }
Strings are kind of nice like this, you can push characters or string slices to them. So to be grammatically correct if there is exactly 1 todo left we can use "item" instead of "items".
All that's left is to output our string and return.
    rc.writer.write(output.as_bytes()).unwrap();
    Ok(())
We register these two new helpers in our render function:
    handlebars.register_helper("active_count", Box::new(active_count));
    handlebars.register_helper("is_selected_filter", Box::new(is_selected_filter));
Add them to our template like so:
      <footer class="footer">
        <span class="todo-count">
          <strong>{{#active_count}}{{/active_count}}</strong>
        </span>
        <ul class="filters">
          <li>
            <a href="/show/all"{{#is_selected_filter "ShowAll"}} class="selected"{{/is_selected_filter}}>All</a>
          </li>
          <span> </span>
          <li>
            <a href="/show/active"{{#is_selected_filter "ShowActive"}} class="selected"{{/is_selected_filter}}>Active</a>
          </li>
          <span> </span>
          <li>
            <a href="/show/completed"{{#is_selected_filter "ShowCompleted"}} class="selected"{{/is_selected_filter}}>Completed</a>
          </li>

        </ul>
      </footer>
And our app is complete! A fully server rendered app, with a round trip to the server for any change to the UI. The full code can be found here for a better overview.
Next time we'll look at creating a REST API in Rust, but for now:

Comments (0)
No comments yet. Be the first!