Create a REST API on AWS Lambda using Lambdasync
Create a REST API on AWS Lambda using Lambdasync
AWS Lambda is a pretty great place to put your APIs, you don't need to configure any servers, you pay only for what you use, and it automatically scales as your audience does.
It can be a little tricky to get started though, this guide will talk you through building a basic API on Lambda.
AWS prerequisites
To follow this tutorial you must have an account at Amazon Web Services, and you must have a set of security credentials ready.
You can get your AWS access key and secret key by following these instructions: http://goo.gl/aMbXsg
Setting up the project
To set up the project that will be deployed on AWS Lambda we'll use Lambdasync which is my pet project to make deploying APIs to Lambda a lot easier.
npm install -g lambdasync
Once that finishes we'll let lambdasync create a new project:
lambdasync new notetaker
Just follow the guide and supply it your AWS credentials. Lambdasync creates a new folder and scaffolds everything we need to deploy what is basically a hello world example to Lambda.
I'm imagining this API will be for a note taker app so I'm naming the project notetaker, but since it will Create, Read, Update and Delete objects by id it could store pretty much anything.
If you go into your new project folder and check out the index.js file you can see it looks like this:
exports.handler = (event, context, callback) => {
  callback(null, {
    statusCode: 200,
    headers: {
      'Access-Control-Allow-Origin': '*',
      'Content-Type': 'application/json'
    },
    body: JSON.stringify('Everything is awesome!')
  });
};
This is your Lambda handler function that will be executed whenever someone calls your API.
event will contain any interesting information about the request, this is where we will find request parameters, http method used etc.
context contains some uninteresting meta info about your Lambda environment.
The callback function is where we specify the response from our function. The first param is reserved for errors, as is standard in Node.js land.
The response from your function should always be an object with statusCode, headers and body as above. This is because Lambdasync sets up a Lambda proxy integration which lets the function response dictate HTTP status and headers.
Deploy this function by running lambdasync in the root of your project folder. Once it is done you will have the URL to your API copied to your clipboard. Paste it into the browser and you should see the result of our callback function.
Before we build on the handler function to do something useful we need to create a place to store our API data.
Setting up a database
For this API we'll use a MongoDB database hosted on mLab. mLab is awesome for this kind of prototyping. In very few steps we get a working database for free.
Go to mLab and sign up.
Once you are logged in you will be greeted by a control panel like this:

Click the Create new button to the far right of MongoDB Deployments:
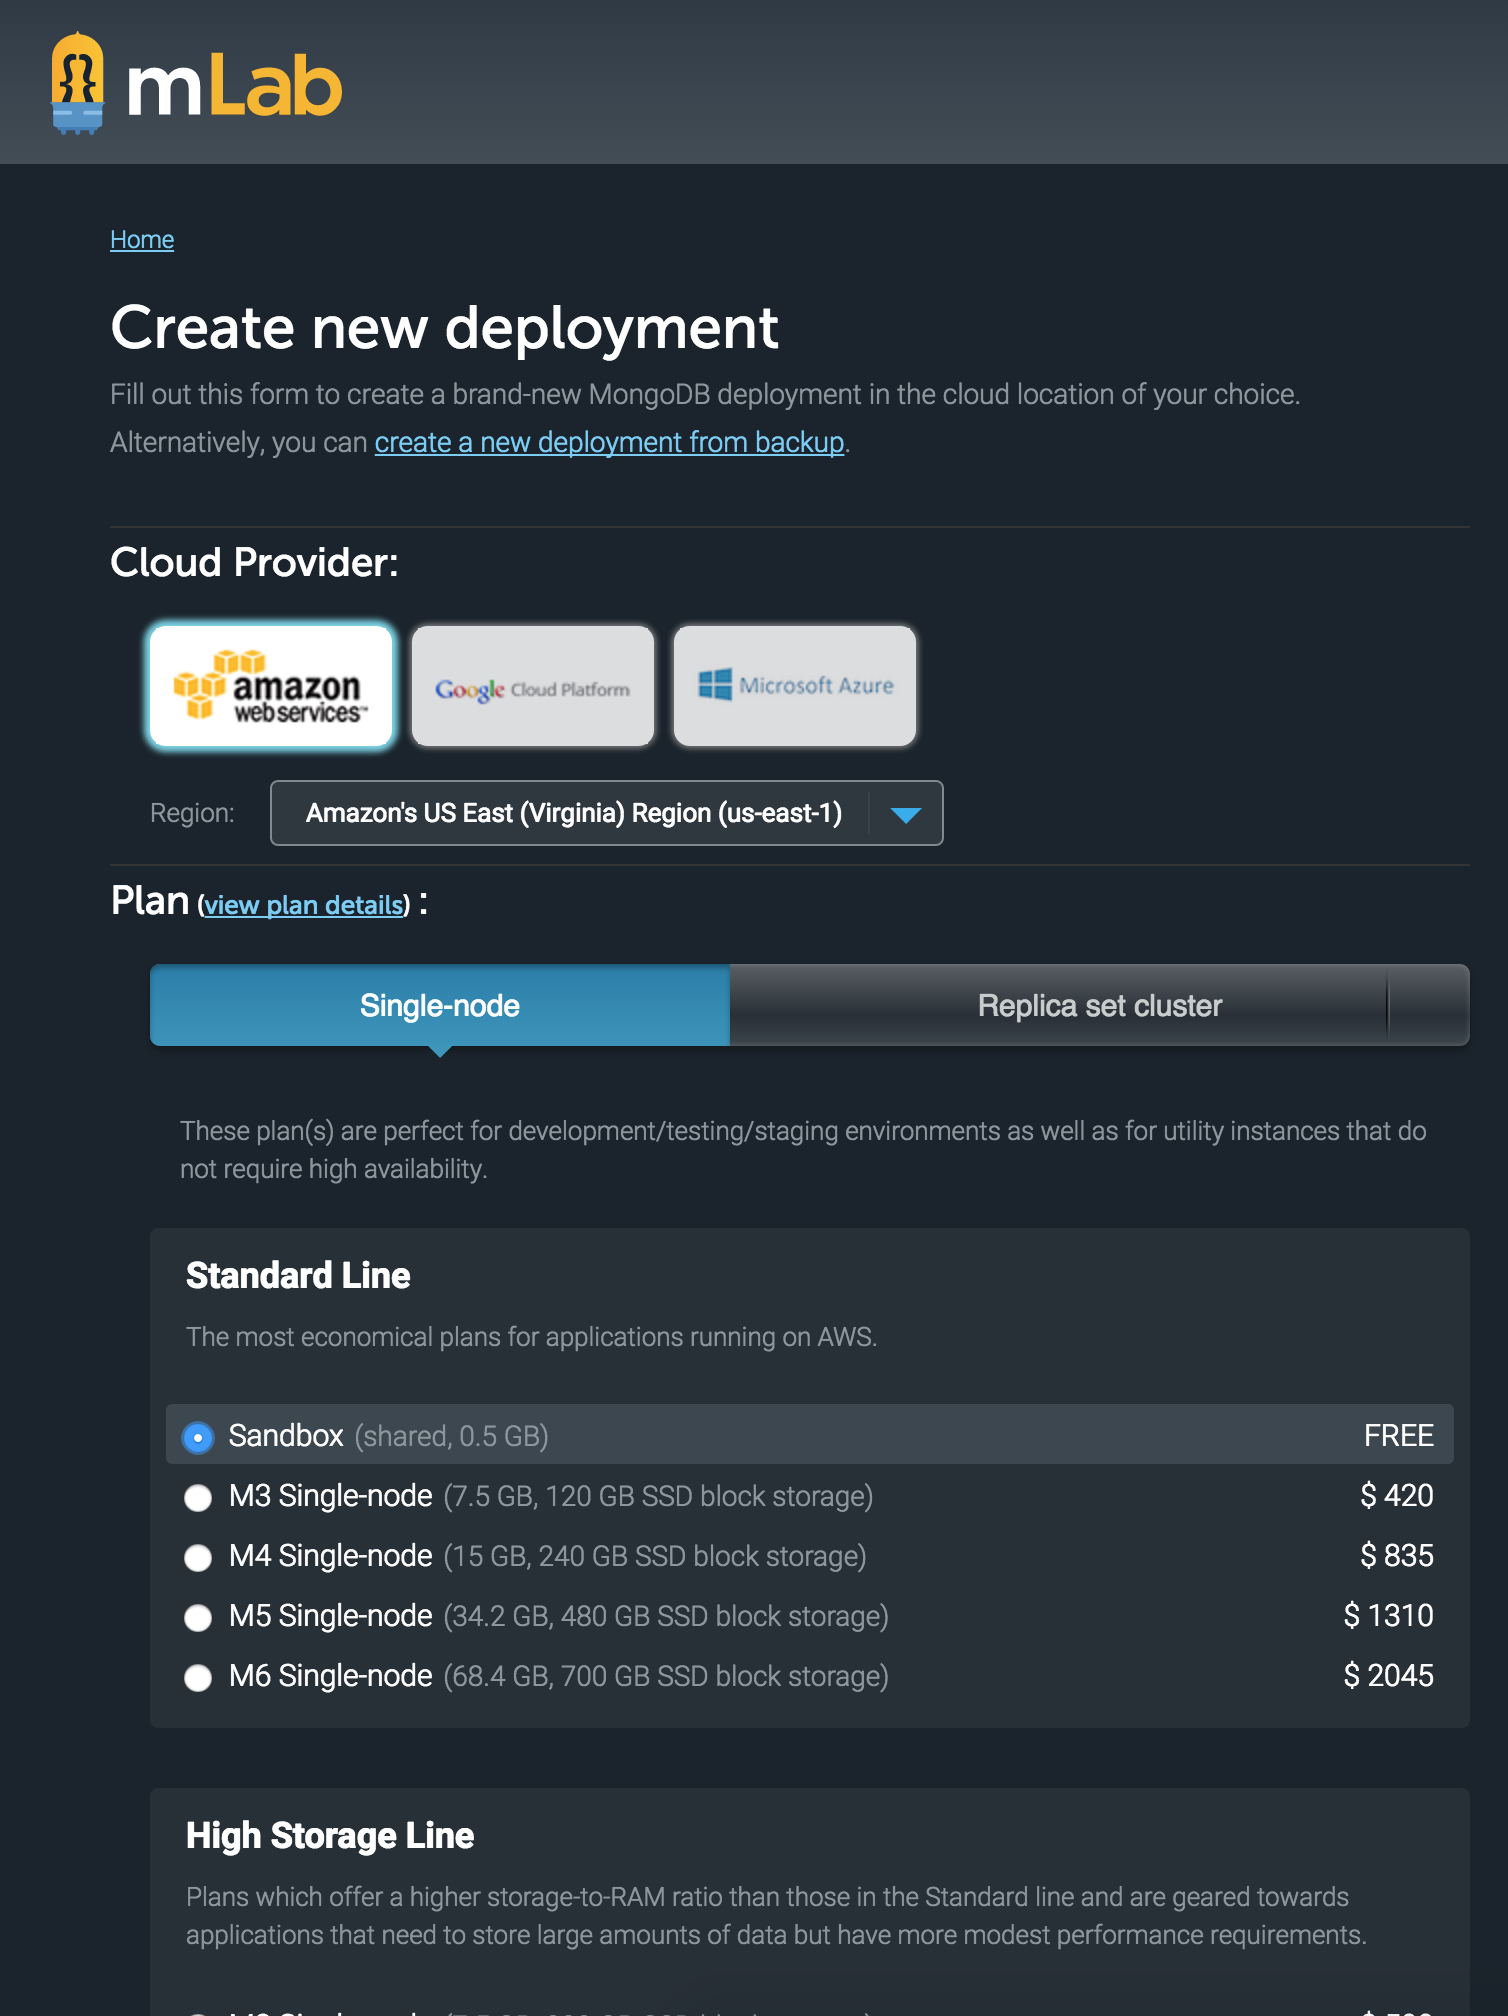
On the next page make sure you click the Single-node tab under Plan to reveal the free Sandbox option.
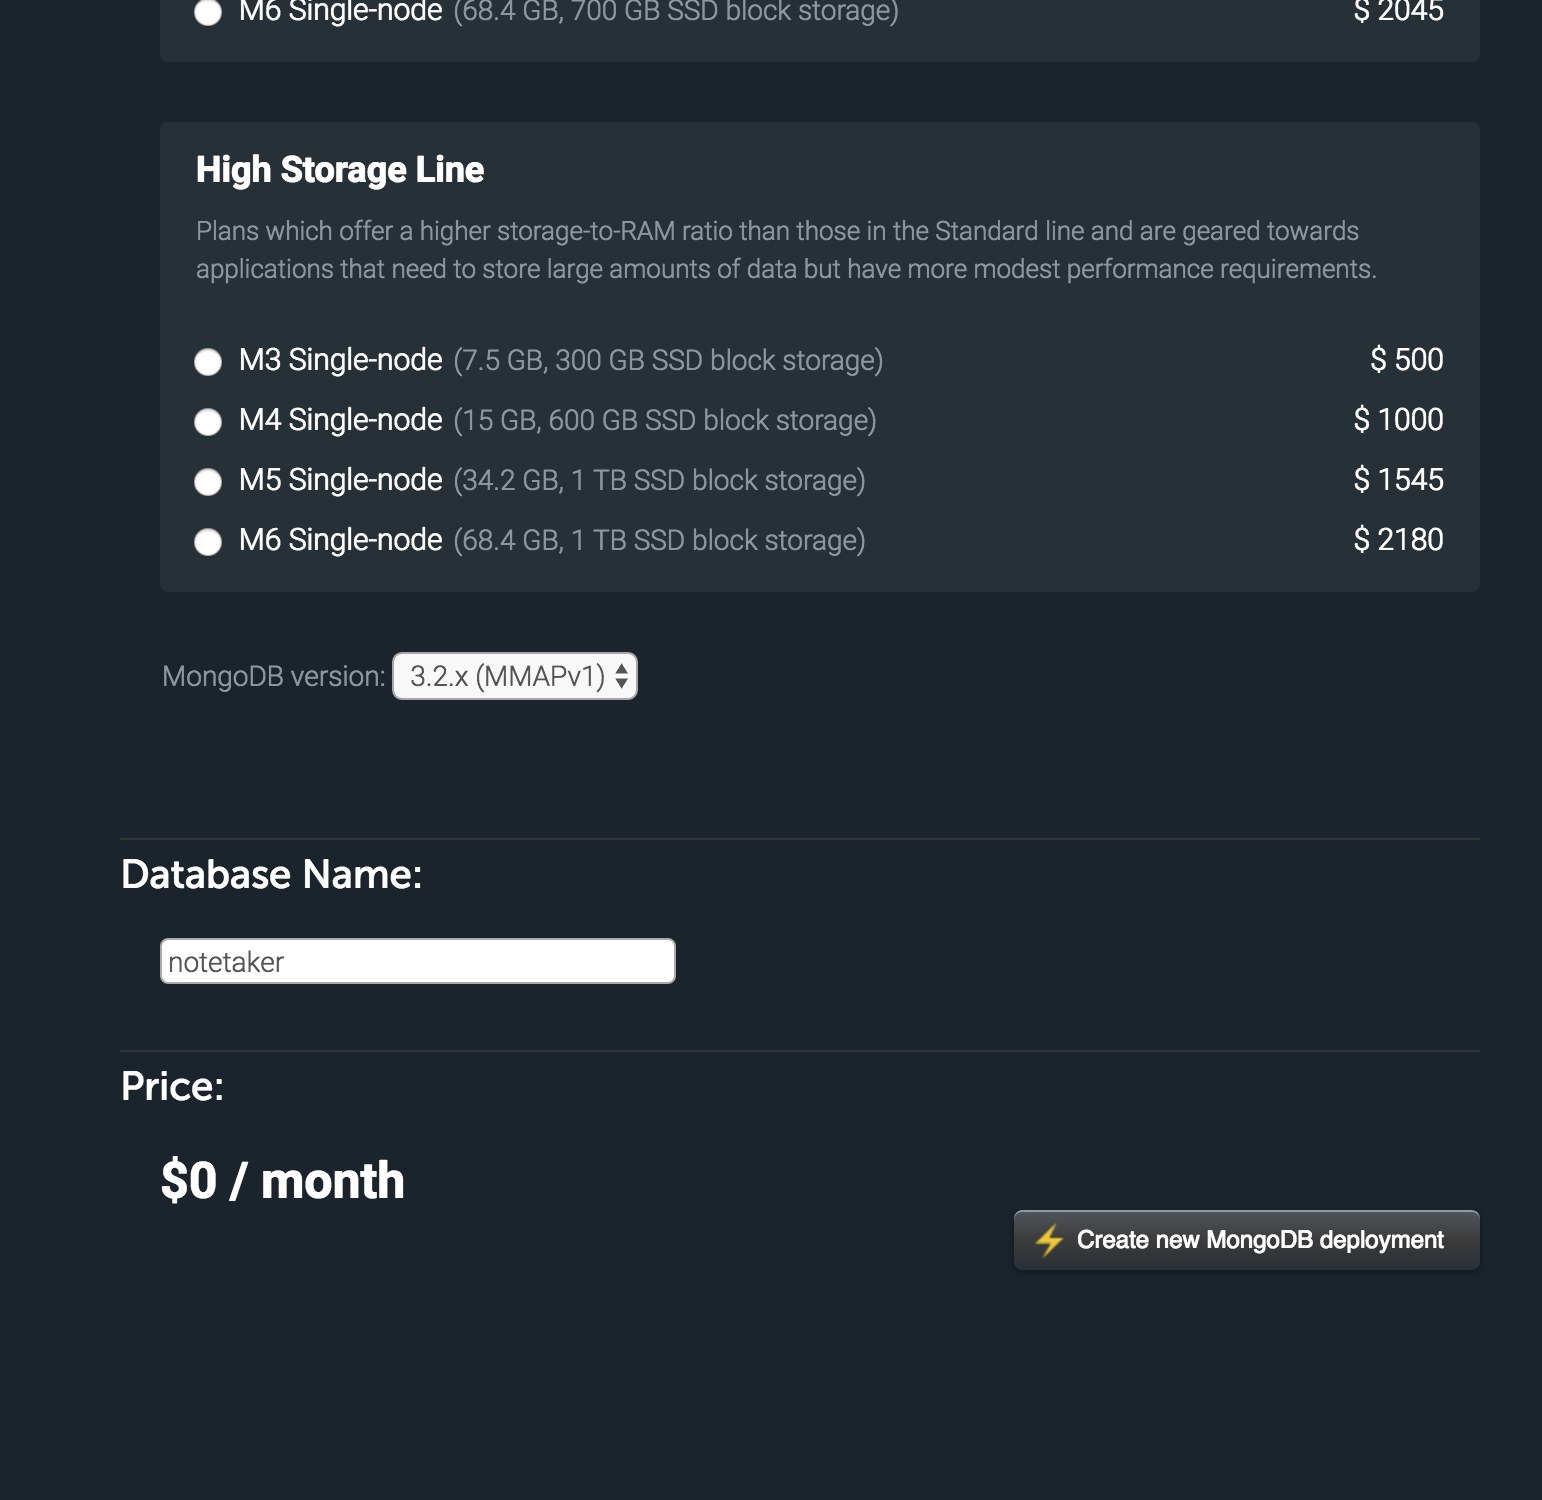
Finally just give your database any name you like and click Create new MongoDB deployment.
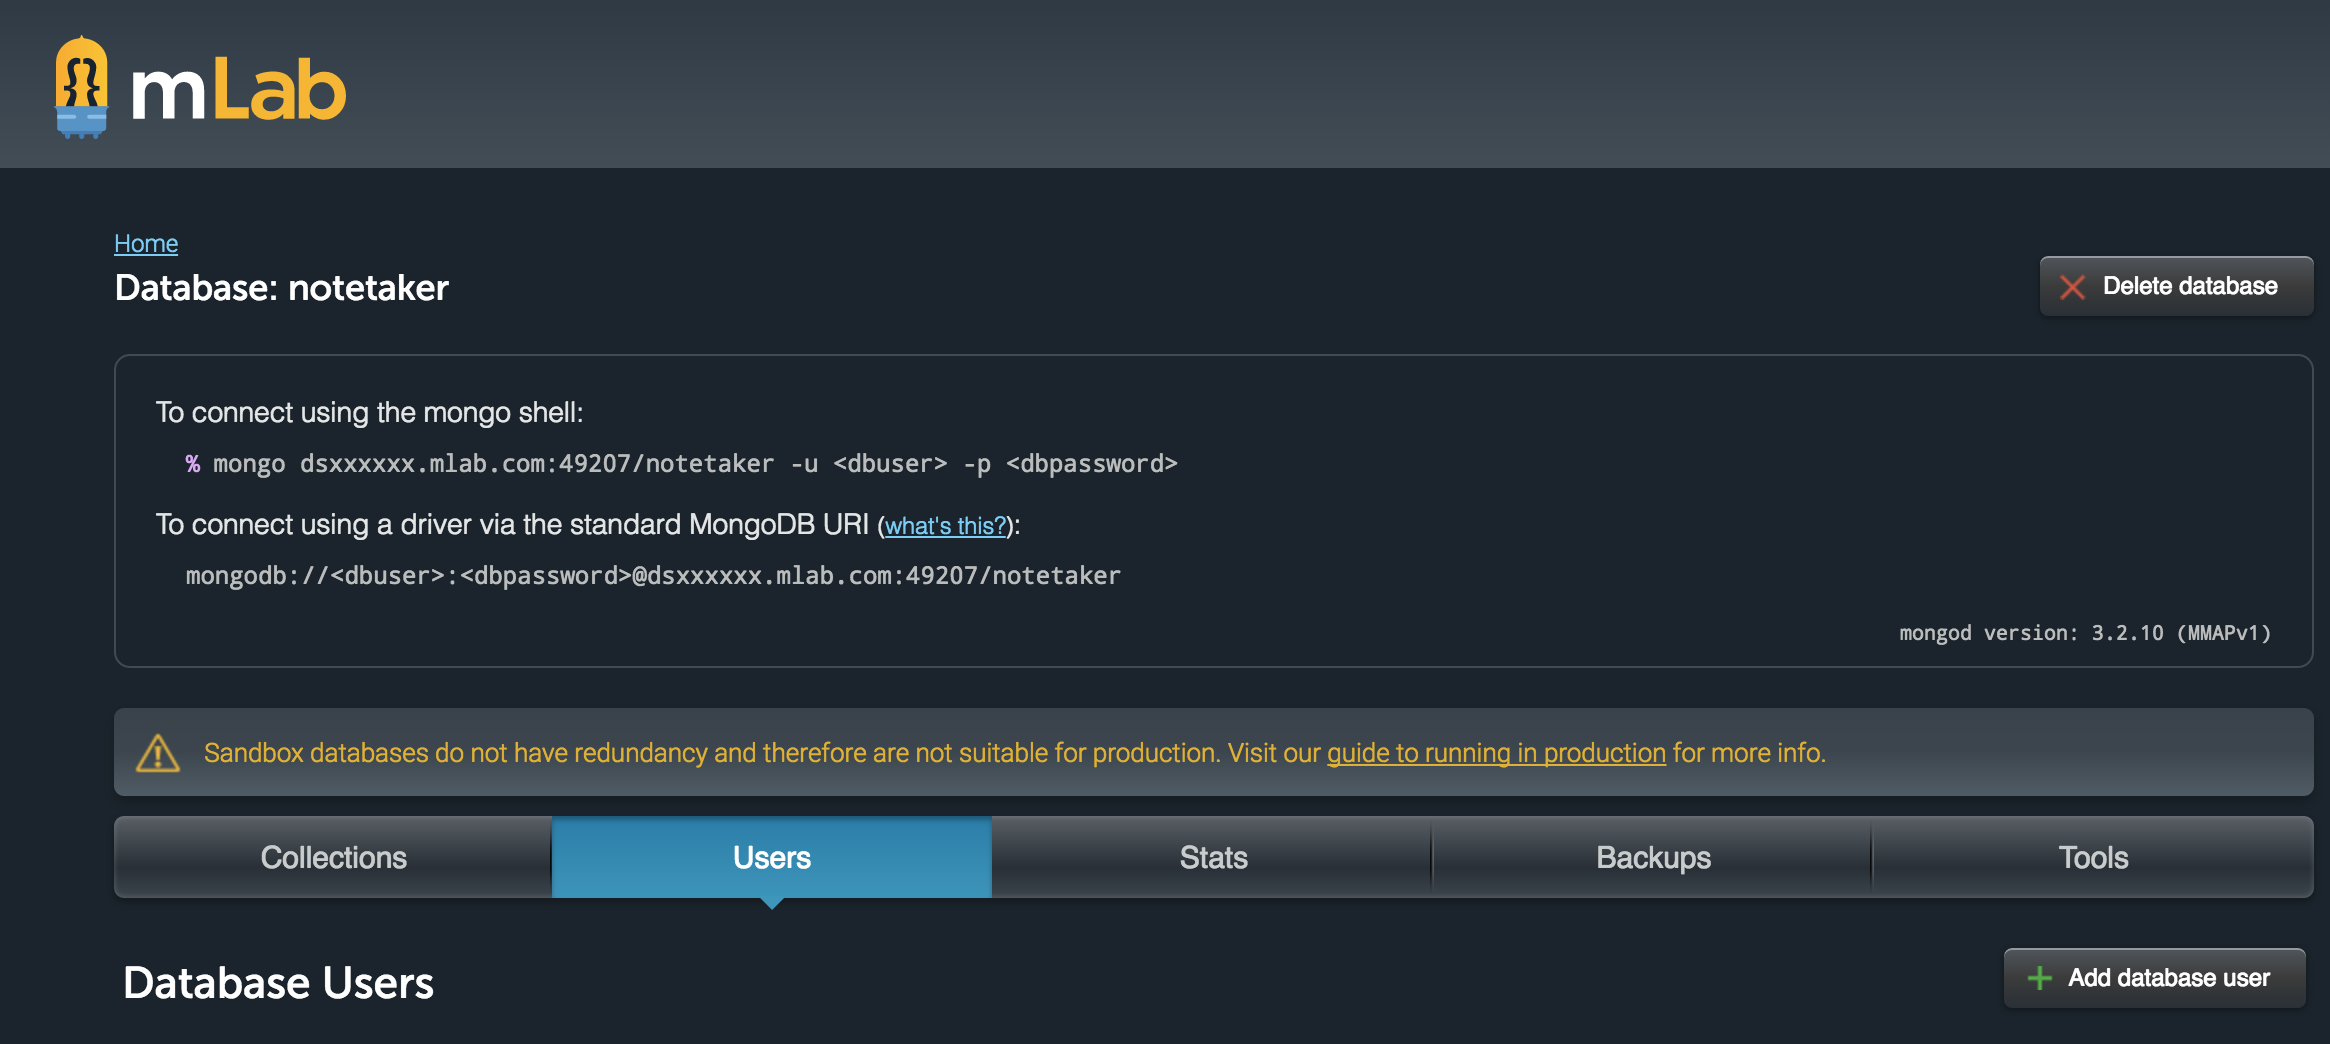
To connect to our database from Node.js we'll use a mongodb:// URL, you can see that mLab gives us this URL on the database page: mongodb://<dbuser>:<dbpassword>@dsxxxxxx.mlab.com:49207/notetaker for my database.
The one thing missing there is a user and password for our database, so let's create a user by clicking the Add database user to the far right of Database Users. Enter whatever username and password you want, make note of them, and copy the mongodb:// URL for your database. We'll use them next.
The event object
As mentioned earlier the event object passed to your handler contains most useful information you could want from an incoming request. The whole thing looks like this:
{
  resource: '/{proxy+}',
  path: '/',
  httpMethod: 'GET',
  headers: {
    host: '127.0.0.1',
  },
  queryStringParameters: {},
  stageVariables: {},
  requestContext: {
    accountId: '598075967016',
    resourceId: 'p60cnqfpea',
    stage: 'prod',
    requestId: 'cb8b2c6b-cp7f-11e6-921a-0f16afc9bdc3',
    identity: {
      cognitoIdentityPoolId: null,
      accountId: null,
      cognitoIdentityId: null,
      caller: null,
      apiKey: null,
      sourceIp: '::1',
      accessKey: null,
      cognitoAuthenticationType: null,
      cognitoAuthenticationProvider: null,
      userArn: null,
      userAgent: 'Mozilla/5.0 (Macintosh; Intel Mac OS X 10_12_1) AppleWebKit/537.36 (KHTML, like Gecko) Chrome/55.0.2883.95 Safari/537.36',
      user: null
    },
    resourcePath: '/{proxy+}',
    httpMethod: 'GET',
    apiId: '0l1fx6nld6'
  },
  body: null,
  isBase64Encoded: false
}
The interesting parts are basically:
bodywill contain any params sent as json.headerscontains request headerspathgives us the relative path of the requesthttpMethodtells us the http method used
Environment variables
The mongodb url we have, complete with username password, is a perfect use for an environment variable, since we don't want to put sensitive information in our source code. Environment variables can be added in the AWS Lambda control panel, or by using the lambdasync secret command like this:
lambdasync secret MONGO_URL=mongodb://xxxxxx:yyyyyy@dszzzzzz.mlab.com:49207/notetaker
Add your mongo url like that and let's also install the mongodb Node.js driver before we get to coding:
npm install -SE mongodb
Connecting to our database
const MongoClient = require('mongodb').MongoClient;

exports.handler = function handler(event, context, callback) {
  const MONGO_URL = process.env.MONGO_URL || null;
  MongoClient.connect(MONGO_URL, function (err, db) {
    if (err) {
      return callback(null, err);
    }

    db.close();
    callback(null, "Successful db connection")
  });
};
Note: Environment variable support is fairly new in AWS Lambda, previous versions of Lambdasync used API Gateway stage variables to store secrets
Connecting to a mongo database using the standard driver is pretty straightforward, we get the MONGO_URL from process.env, send it in to the connect method, and supply a callback function that will give us a db instance if it worked.
Closing the db connection with db.close() when done is important, or the Lambda request will time out.
Adding notes
Alright, we've got us a database connection. Let's start by adding notes, I want you to npm install one more module before we start:
npm install -SE node-uuid
node-uuid will help us generate a unique id for each note.
'use strict';
const MongoClient = require('mongodb').MongoClient;
const uuid = require('node-uuid').v4;

const SUCCESS = {
  result: 'success'
};
const STATUS_CODE_OK = 200;
const STATUS_CODE_NOT_FOUND = 404;
const STATUS_CODE_ERROR = 500;

function addNote(db, note) {
  return new Promise((resolve, reject) => {
    db
      .collection('notes')
      .insertOne(
        Object.assign({}, note, {
          id: uuid(),
          pinned: false
        }),
        err => {
          if (err) {
            reject(err);
          }
          resolve(SUCCESS);
        }
      );
  });
}

function isResponseObject(subject) {
  return typeof response === 'object' && response.statusCode && response.headers && response.body;
}

function formatResponse(statusCode, response) {
  // Check if we have a valid response object, and if so, return it
  if (isResponseObject(response)) {
    return response;
  }

  let body = '';
  try {
    if (response) {
      body = JSON.stringify(response);
    } else {
      body = JSON.stringify('');
    }
  } catch(err) {
    body = JSON.stringify(response.toString())
  }

  return {
    statusCode: statusCode || STATUS_CODE_OK,
    headers: {
      'Access-Control-Allow-Origin': '*'
    },
    body
  };
}

function respondAndClose(db, callback, response, statusCode) {
  db.close();
  return callback(null, formatResponse(statusCode, response));
}

exports.handler = function handler(event, context, callback) {
  const MONGO_URL = process.env.MONGO_URL || null;

  let body = null;
  try {
    body = JSON.parse(event.body);
  } catch(err) {
    // meh
  }

  MongoClient.connect(MONGO_URL, function (err, db) {
    if (err) {
      return callback(err);
    }

    switch (event.context.httpMethod) {
      case 'POST':
        addNote(db, body)
          .then(res => respondAndClose(db, callback, res, STATUS_CODE_OK))
          .catch(err => respondAndClose(db, callback, err, STATUS_CODE_ERROR));
        break;
      default:
        respondAndClose(db, callback, {
          result: 'unhandled request'
        }, STATUS_CODE_NOT_FOUND);
    }
  });
};
We add a function to add a note, it takes an incoming POST json object, adds a unique id and a pinned boolean to it, since we want the ability to pin notes, and finally adds that to the mongodb notes collection using the insertOne method. addNote returns a promise so it will either resolve or reject.
We also add some convenience functions respondAndClose that will help us to remember to close the db connection, formatResponse and isResponseObject to help us respond with a {statusCode,headers,body} object.
In our main handler we add a switch to check the http method being used to hit our API. Currently we check for POST and just return a unhandled request response for anything else.
Dev server
It's going to be a little impractical to have to deploy every change to test it out, so Lambdasync comes with a dev server. Start it with:
lambdasync devserver
It will serve your API locally on http://localhost:3003, let's try posting to it, you can do this with curl (example below), Postman or any number of fun ways.
curl --request POST \
  --url http://localhost:3003 \
  --header 'cache-control: no-cache' \
  --header 'content-type: application/json' \
  --data '{"title": "Hello Lambda","text": "This text was added by a lambdasync API"}'
This should give you a {"result":"success"} response. You can edit the title and text and add a few of these. Of course, it would be nice if you could actually retrieve your notes somehow...
Fetching notes
Let's start by adding a getNotes function. It will fetch all notes unless you pass in a filter object, like {pinned: true} to get only pinned notes for example.
function getNotes(db, filter) {
  filter = filter || {};
  return new Promise((resolve, reject) => {
    db.collection('notes').find(filter).toArray((err, data) => {
      if (err) {
        reject(err);
      }
      resolve(data);
    });
  });
}
Next add another clause to the switch to match get requests, and return the result of getNotes.
      case 'GET':
        return getNotes(db)
          .then(res => respondAndClose(db, callback, res, STATUS_CODE_OK))
          .catch(err => respondAndClose(db, callback, err, STATUS_CODE_ERROR));
          break;
Restart the dev server and you should now be able to go to http://localhost:3003 in the browser (or curl, Postman again) and get the JSON for your notes.
Updating and deleting notes
Our API can now Create and Read notes, but how about updating and deleting?
For both of these methods we want to be able to pick out the notes id from the URL that will look like this:
/e2f9b2c4-54b1-496b-a988-7b7c1967813c
For updating there will also be a new note object to replace the old note with. For delete the http verb DELETE and the url is enough.
Let's start with the functions again:
const idRegex = /^\/(.*?)(\/|$)/;
function getIdFromPath(path) {
  const match = idRegex.exec(path);
  return match && match[1];
}

function updateNote(db, noteId, note) {
  if (!note || !noteId) {
    return Promise.reject();
  }
  return new Promise((resolve, reject) => {
    db
      .collection('notes')
      .updateOne({id: noteId}, Object.assign({}, note), err => {
        if (err) {
          return reject(err);
        }
        return resolve(SUCCESS);
      });
  });
}

function deleteNote(db, id) {
  if (!id) {
    return Promise.reject();
  }
  return new Promise((resolve, reject) => {
    db
      .collection('notes')
      .deleteOne({id}, err => {
        if (err) {
          return reject(err);
        }
        return resolve(SUCCESS);
      });
  });
}
We will get the current path from event.path and use some regex in the getIdFromPath function to pick out the id portion of the path.
Inside your handler get the noteId from the path:
exports.handler = function handler(event, context, callback) {
  const MONGO_URL = process.env.MONGO_URL || null;
  const noteId = getIdFromPath(event.path);
  ...
Finally, add this to the switch:
      case 'PUT':
        if (!noteId) {
          return respondAndClose(db, callback, 'Missing id parameter', null);
        }
        updateNote(db, noteId, body)
          .then(res => respondAndClose(db, callback, res, STATUS_CODE_OK))
          .catch(err => respondAndClose(db, callback, err, STATUS_CODE_ERROR));
        break;
      case 'DELETE':
        if (!noteId) {
          return respondAndClose(db, callback, 'Missing id parameter', null);
        }
        deleteNote(db, noteId)
          .then(res => respondAndClose(db, callback, res, STATUS_CODE_OK))
          .catch(err => respondAndClose(db, callback, err, STATUS_CODE_ERROR));
        break;

Deploy this and you are done! Test your API locally and deploy by running `lambdasync` when you're happy with the API.

You can now create, read, update and delete notes with your AWS Lambda API! 🙌

The full example code can be found here: [https://github.com/fanderzon/lambdasync-example/blob/master/index.js](https://github.com/fanderzon/lambdasync-example/blob/master/index.js).

Some curl to try out your API:
// POST curl --request POST \
--url https://yourapihere.execute-api.eu-west-1.amazonaws.com/prod \ --header 'cache-control: no-cache' \ --header 'content-type: application/json' \ --data '{"title": "Hello Lambda","text": "This text was added by a lambdasync API"}'
// GET curl --request GET \
--url https://yourapihere.execute-api.eu-west-1.amazonaws.com/prod \ --header 'cache-control: no-cache'
// DELETE (replace 9fdcf243-d212-446f-9654-a97e241c66c1 with one of your note ids) curl --request DELETE \
--url https://yourapihere.execute-api.eu-west-1.amazonaws.com/prod/fdcf243-d212-446f-9654-a97e241c66c1 \ --header 'cache-control: no-cache'
// UPDATE (replace 9fdcf243-d212-446f-9654-a97e241c66c1 with one of your note ids) curl --request PUT \
--url https://yourapihere.execute-api.eu-west-1.amazonaws.com/prod/9fdcf243-d212-446f-9654-a97e241c66c1 \ --header 'cache-control: no-cache' \ --header 'content-type: application/json' \ --data '{"id":"9fdcf243-d212-446f-9654-a97e241c66c1","title":"New title","text":"New text too","pinned": true}' ```
Comments (0)
No comments yet. Be the first!