Authenticating a REST API on AWS Lambda using Auth0
Authenticating a REST API on AWS Lambda using Auth0
If you followed along in the previous tutorial, Create a REST API on AWS Lambda using Lambdasync, you should have a simple API for a note taker app, hosted on AWS Lambda, backed by a MongoDB database hosted on mLab.
Sounds great? Sure, but it does however have a pretty major flaw, it has no concept of users and everyone calling the API will have access to the same notes. Makes for a very simple getting started example, but not especially useful in a real world scenario.
Let's fix that! By the end of this tutorial you will have:
- A login/sign up flow through Auth0
- An authenticated API that Creates, Reads, Updates and Deletes
notesrecords for the authenticated user
This post is a stand alone follow up to the previous post mentioned above. You will recognize some of the code if you followed along with the previous tutorial, but it's not required.
Authentication as a service
My main fascination with AWS Lambda and Function as a Service in general is the idea of focus.
By leaving server config and scaling to companies that focus on that part, like AWS, it frees me up to focus only on what should happen when a user's request reaches my API.
In the same way I can delegate a lot of my user management and authentication issues to a third party focusing on that.
Auth0 does this particularly well, with products like Lock that handles the registration/login process on the client side, producing a JSON Web Token that we can use on the server side to establish the identity of the user making the request.
We will build a note taking app, using Auth0 to authenticate the user through email/password, Facebook or Google, and let the user create, read, update and delete only his/her own notes.
The focus will be on the API side, there will be client side consisting of a html file and an express server to serve the html file on port 3001, but we won't cover any details about that except for the Auth0 client side parts.
Prerequisites
You will need an AWS account and credentials, instructions on how to get your credentials can be found here.
You will also need to have Lambdasync installed globally. We'll use it to deploy our Lambda function:
npm install -g lambdasync
You will also need a MongoDB database and a mongodb:// URL to connect to before you get started, instructions on how to set up a free MongoDB database can be found here, it's a fairly quick process that takes a few minutes.
In case you are only here for the basic Auth0 setup help, you're in luck, since that is exactly where we will start.
Auth0 set up
Make an account at auth0.com, they will ask you a bunch of stuff and set up a Default app for you.
I recommend you set up a new Client for this though, start by clicking the + New Client button on the dashboard:

Give it an appropriate name, select Single Page Web Applications and click Create:
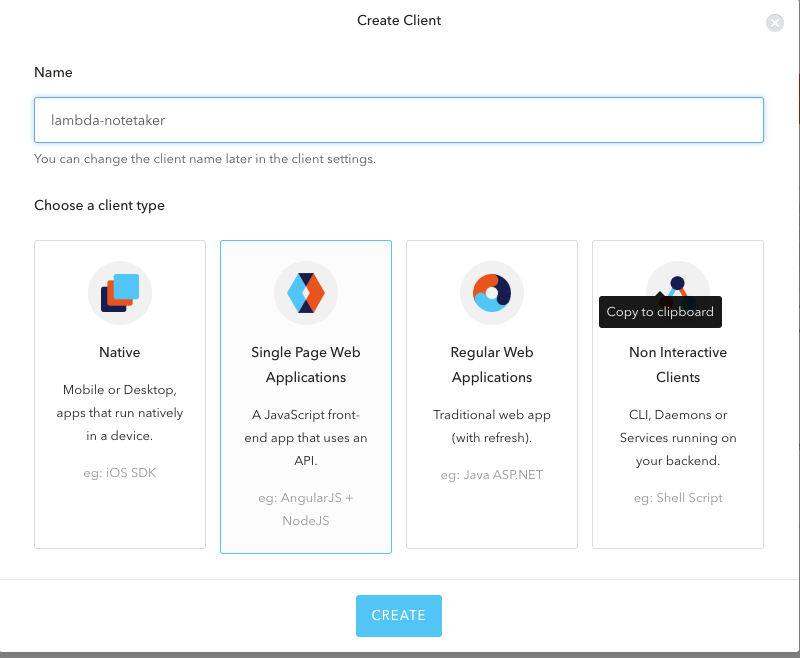
Select JavaScript on the next screen of front end frameworks´.
Congratulations! You have created a new Auth0 Client. You are even given some quick start code that tells you how to implement a login on your site, very helpful.
Ignore that for now though and jump over to the settings tab.
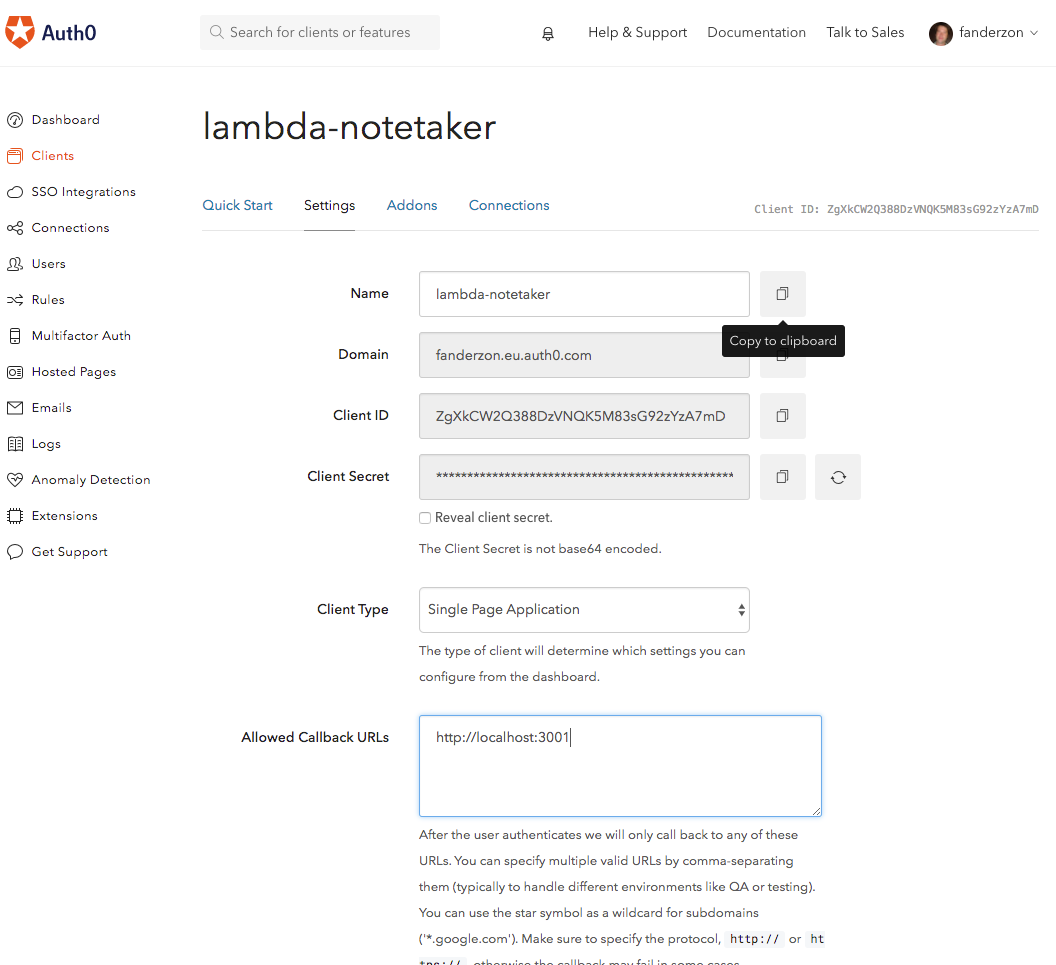
Make note of your Domain, Client ID and Client Secret here, you will need them soon.
Before we get to any coding we need to first set the Allowed Callback URLs, Allowed Logout URLs and Allowed Origins (CORS). This is so that no malicious sites can hijack your user's logins.
For Callback and Logout enter http://localhost:3001 and for CORS just enter localhost:3001 without the protocol.
If you know the URL of your production environment you may as well add that too, it's just comma separated lists.
Save and head over to the Connections tab to make sure you have Facebook, Google and Username-Password-Authentication turned on, these should be Auth0 defaults, but it doesn't hurt to confirm.
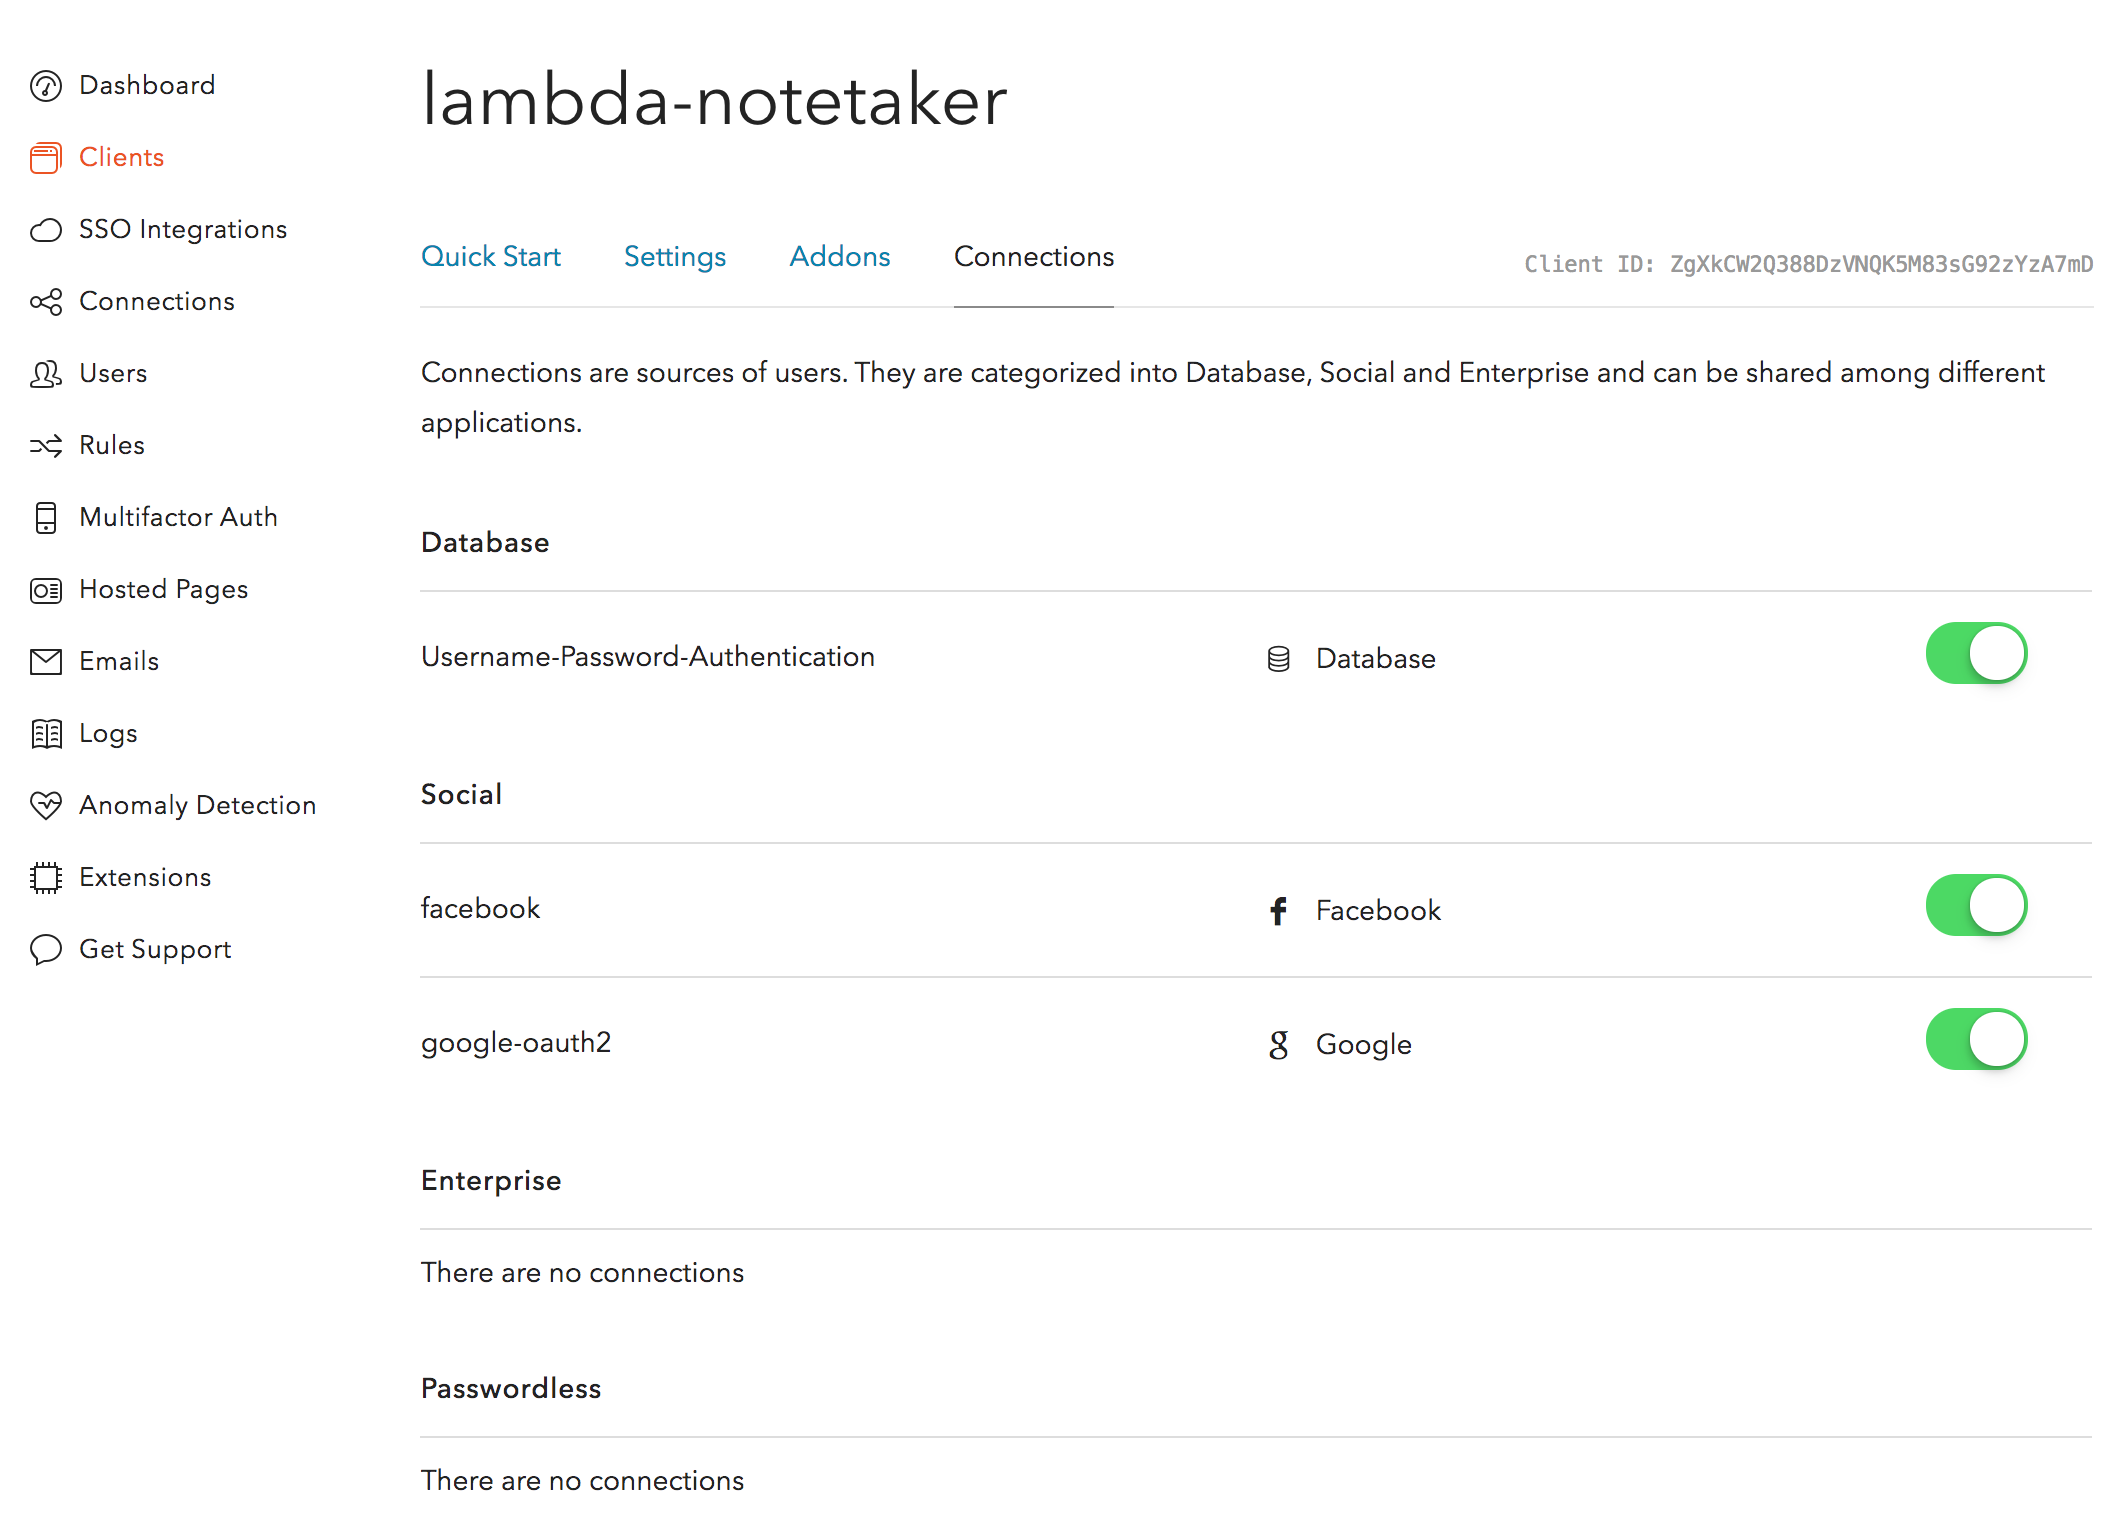
If you just signed up for Auth0, however, these connections have not been activated yet. Click on Connections on the left hand menu, and then on Social and it should look something like this:
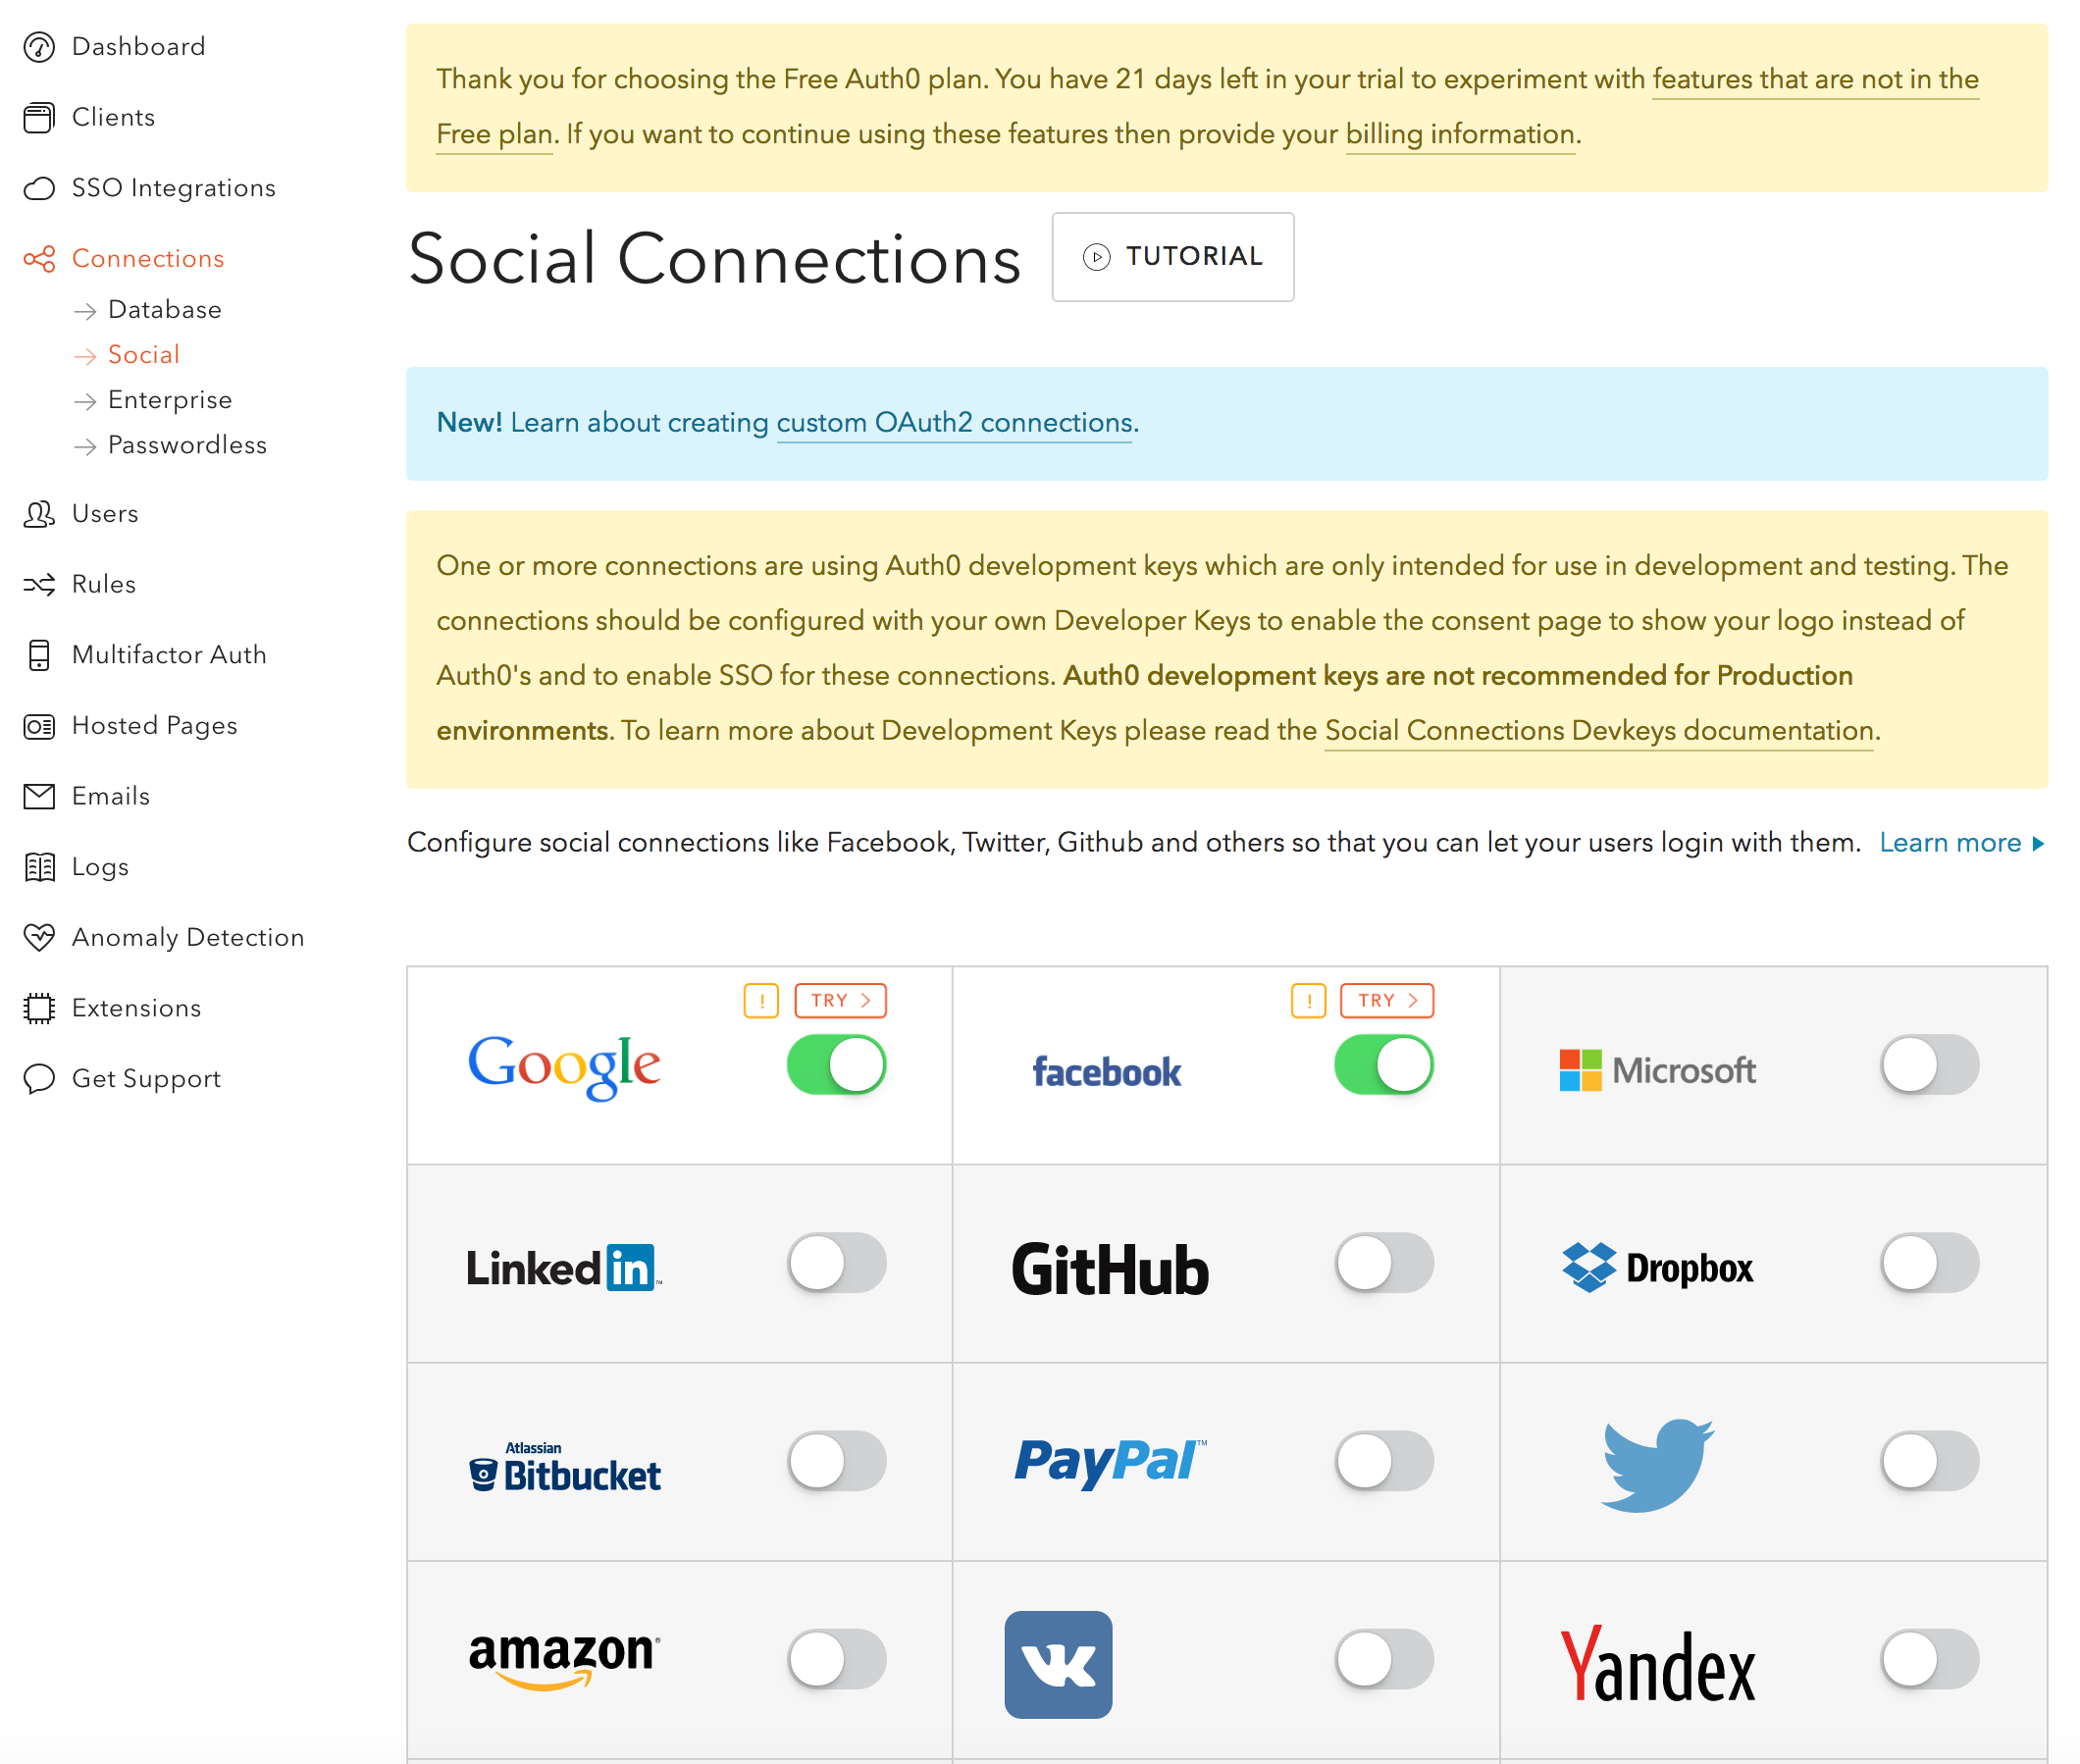
Click the little !-icon for Google and facebook and activate them using the defaults.
Client side login/signup code
Auth0 makes this part extremely easy with a library called Lock, you can install it from npm as auth0-lock but for this project we will just get it from a CDN.
<script src="https://cdn.auth0.com/js/lock/10.6/lock.min.js"></script>
<script>
  var lock = new Auth0Lock(
    YOUR_AUTH0_CLIENT_ID_HERE,
    YOUR_AUTH0_DOMAIN_HERE
  );

  lock.on("authenticated", function(authResult) {
    // Use the token in authResult to getProfile() and save it to localStorage
    lock.getProfile(authResult.idToken, function(error, profile) {
      if (error) {
        // Handle error
        return;
      }
      localStorage.setItem('idToken', authResult.idToken);
      localStorage.setItem('profile', JSON.stringify(profile));
    });
  });

  // This is the part that shows the login dialog
  lock.show();
</script>
You initialize Lock with your client id and domain from Auth0, and then call lock.show() whenever you want to show the login dialog.
You can listen to an authenticated event which gives you the idToken that you will send to the API for every request requiring authentication (which is why we save it to localStorage).
Lock also makes it easy to get the profile data on the user by just passing the idToken to lock.getProfile.
There isn't really much else we will need to worry about concerning login or signup. Our app will have a Login or sign up button triggering lock.show(), and we will check localStorage for an idToken to know if a user is logged in or not.
Copy the code from the client directory from here https://github.com/lambdasync/lambdasync-example-auth0/blob/master/client/ and simply npm install and start it with node index.js.
API Code
There's not much point to try out the client until we have an API.
Let's start by looking at the authentication, the main reason we're here. Create a src folder and create an auth.js file.
src/auth.js
'use strict';
const jwt = require('jsonwebtoken');

const AUTH0_DOMAIN = process.env.AUTH0_DOMAIN || null;
const AUTH0_CLIENT = process.env.AUTH0_CLIENT || null;
const AUTH0_SECRET = process.env.AUTH0_SECRET || null;

const credentials = {
  audience: AUTH0_CLIENT,
  issuer: `https://${AUTH0_DOMAIN}/`
};

function authenticate(token) {
  return new Promise((resolve, reject) => {
    if (!token) {
      reject('Authorization token missing.');
    }

    jwt.verify(
      token.replace('Bearer ', ''),
      AUTH0_SECRET,
      credentials,
      (err, res) => {
        if (err) {
          return reject(err);
        }
        return resolve(res.sub);
      }
    );
  });
}

module.exports = authenticate;
Authentication with JSON Web Tokens
The token you get from the Auth0 login i a JSON Web Token, or JWT. A JWT is a hash consistsing of 3 parts, separated by dots.
The first 2 parts are base64 encoded JSON objects, a header and a payload object. The header contains an alg field, which is the hashing algorithm and typ, the token type, and typically looks like this:
{
  "alg": "HS256",
  "typ": "JWT"
}
The payload will typically contain iss, the issuer which in our case will be the Auth0 domain, sub, the subject which will be the userId, aud, the audience which will the the Auth0 client id, and exp which is the timestamp when the token expires.
The first two parts are easily decodable, it's the third part that is the secure signature part. The signature can be verified using the secret it was created with, which also verifies that the headers and payload are the same as the signature was created for.
Verifying a token
The authenticate function we created above returns a promise, either with an error or the decoded payload.
To verify the token on the API side, we make use of jsonwebtoken's verify method, which takes the token, and the secret as mandatory arguments. As a bonus it lets us pass an options object with aditional things to verify, so we pass it a third argument to verify that the audience and issuer fields are what we expect.
The verify method will call our callback with either an error or the decoded payload, and we use that to reject or resolve our promise.
That's it for authentication. We'll continue adding building blocks and utility functions before we get to the business logic.
MongoDB connection
The next file we'll add will handle connecting to our MongoDB database:
src/db.js
'use strict';
const MongoClient = require('mongodb').MongoClient;

function connect() {
  const MONGO_URL = process.env.MONGO_URL || null;

  return new Promise((resolve, reject) => {
    MongoClient.connect(MONGO_URL, function (err, db) {
      if (err) {
        return reject(err);
      }
      return resolve(db);
    });
  });
}

module.exports = connect;
Again this is a promise that will either reject with an error or resolve with the db connection.
Util functions and constants
src/constants.js
'use strict';
const COLLECTION_NOTES = 'notes';
const SUCCESS_RESPONSE = {
  result: 'success'
};

const STATUS_CODES = {
  OK: 200,
  BAD_REQUEST: 400,
  INTERNAL_SERVER_ERROR: 500
};

module.exports = {
  COLLECTION_NOTES,
  SUCCESS_RESPONSE,
  STATUS_CODES
};
src/util.js
'use strict';
const CONSTANTS = require('./constants');

function isResponseObject(subject) {
  return typeof response === 'object' && response.statusCode && response.headers && response.body;
}

function formatResponse(statusCode, response) {
  // Check if we have a valid response object, and if so, return it
  if (isResponseObject(response)) {
    return response;
  }

  let body = '';
  try {
    if (response) {
      body = JSON.stringify(response);
    } else {
      body = JSON.stringify('');
    }
  } catch(err) {
    body = JSON.stringify(response.toString())
  }

  return {
    statusCode: statusCode || CONSTANTS.STATUS_CODES.OK,
    headers: {
      'Access-Control-Allow-Origin': '*'
    },
    body
  };
}

function respondAndClose(db, callback, response, statusCode) {
  db.close();
  return callback(null, formatResponse(statusCode, response));
}

const idRegex = /^\/api\/(.*?)(\/|$)/;
function getIdFromPath(path) {
  const match = idRegex.exec(path);
  return match && match[1];
}

module.exports = {
  respondAndClose,
  getIdFromPath,
  formatResponse
};
Most of the util functions are related to the format of the response object, which for a Lambda proxy integration should be a {httpMethod, headers, body} object.
respondAndClose is a little helper function that closes the db connection, and formats the response correctly so that we don't have to worry about that in the app logic.
getIdFromPath will pick out the noteId from a path like /cd062d26-f62c-4ef5-8083-83e4fd86b4b9.
With all of this in place, let's get down to business!
Entrypoint
Lambdasync mandates that the entrypoint to our app should be index.js in the root folder, so we create a minimal one, that only loads and returns an app module;
index.js
'use strict';
const app = require('./src/app');

exports.handler = app;
Adding notes
src/app.js
'use strict';
const note = require('./note');
const util = require('./util');
const auth = require('./auth');
const connect = require('./db');
const CONSTANTS = require('./constants');

const STATUS_CODES = CONSTANTS.STATUS_CODES;
const respondAndClose = util.respondAndClose;

function app(event, context, callback) {
  if (!event || !event.headers) {
    callback({
      error: 'Not a valid event object'
    });
  }

  let userId;

  return auth(event.headers.Authorization)
    .then(id => userId = id)
    .then(connect)
    .then(db => handleRequest(db, userId, event, callback))
    .catch(err => callback(null, util.formatResponse(500, err.message)));
}

function handleRequest(db, userId, event, callback) {
  const noteId = util.getIdFromPath(event.path);
  let body = null;
  try {
    body = JSON.parse(event.body);
  } catch(err) {
    // meh
  }

  switch (event.httpMethod) {
    case 'POST':
      return note.addNote(db, userId, body)
        .then(res => respondAndClose(db, callback, res))
        .catch(err => respondAndClose(db, callback, err.message, STATUS_CODES.INTERNAL_SERVER_ERROR));
      break;
    default:
      respondAndClose(db, callback, 'unhandled request', STATUS_CODES.BAD_REQUEST);
  }
}

module.exports = app;
We get an event from Lambda, pass the Authorization header to the auth function. If the request is successfully authorized, we save the userId to an outside variable.
Next we call connect to get a db connection and if that all worked we pass on everything to a new function handleRequest.
This will be our routing function, separating requests by http method and calling the appropriate CRUD functions, and relaying the response or error back.
We start with the logic for adding notes, handling POST requests and passing them onto the addNote function, which we will create next:
src/note.js
'use strict';
const uuid = require('node-uuid').v4;

const CONSTANTS = require('./constants');

function addNote(db, userId, note) {
  if (!userId || !note) {
    return Promise.reject('No userId or note to add.');
  }
  return new Promise((resolve, reject) => {
    db
      .collection(CONSTANTS.COLLECTION_NOTES)
      .insertOne(
        Object.assign({}, note, {
          id: uuid(),
          userId,
          pinned: false
        }),
        err => {
          if (err) {
            reject(err);
          }
          resolve(CONSTANTS.SUCCESS_RESPONSE);
        }
      );
  });
}

module.exports = {
  addNote
};
addNote returns a promise and tries to insert a new object into our database, the incoming note object will contain title and text, and we add some required fields to it, id created by the node-uuid library, userId and pinned.
If successful we'll return our standard success response, otherwise reject with an error.
Now that we have all the pieces in place we should be able to deploy this, first install our 3 dependencies:
npm install -SE jsonwebtoken mongodb node-uuid
Once that's done run lambdasync to deploy your changes.
Testing in the client
With the API in place it's time to fire up the client. In client/index.html edit these lines:
var API_URL = 'YOUR_API_URL_HERE';
var AUTH0_CLIENT = 'YOUR_AUTH0_CLIENT_ID_HERE';
var AUTH0_DOMAIN = 'YOUR_AUTH0_DOMAIN_HERE';
```

Then head to [http://localhost:3001](http://localhost:3001). Click the login button and login with whatever method you prefer.

Once logged in fill in a title and some text for a note and save, if you look at the network tab you should see a successful 200 response, but of course no notes on the page yet. Our API needs to be able to list notes for that. 🙂

### Listing notes

**`src/app.js`**

```
...
    case 'GET':
      return note.getNotes(db, userId)
        .then(res => respondAndClose(db, callback, res))
        .catch(err => respondAndClose(db, callback, err.message, STATUS_CODES.INTERNAL_SERVER_ERROR));
```

**`src/note.js`**

```
...
function getNotes(db, userId) {
  const filter = {userId};
  return new Promise((resolve, reject) => {
    db.collection(CONSTANTS.COLLECTION_NOTES).find(filter).toArray((err, data) => {
      if (err) {
        reject(err);
      }
      resolve(data);
    });
  });
}

module.exports = {
  getNotes,
  addNote
};
```

Add another clause to the switch in `src/app.js` to handle GET requests.

Then add a getNotes function to `src/note.js`. We don't have to do much other than pass a filter object with the userId to the `find` method of the MongoClient and return the result (or error).

If you deploy this with `lambdasync` and refresh the client app you should be able to see the note you saved before.

### Editing notes

**`src/app.js`**

```
...
    case 'PUT':
      if (!noteId) {
        return respondAndClose(db, callback, 'Missing id parameter', STATUS_CODES.BAD_REQUEST);
      }
      return note.updateNote(db, userId, noteId, body)
        .then(res => respondAndClose(db, callback, res))
        .catch(err => respondAndClose(db, callback, err.message, STATUS_CODES.INTERNAL_SERVER_ERROR));
```

**`src/note.js`**

```
...
function getNote(db, id, userId) {
  const filter = {id};
  return new Promise((resolve, reject) => {
    db.collection(CONSTANTS.COLLECTION_NOTES).findOne(filter, (err, data) => {
      if (err) {
        return reject(err);
      }
      // If a usedId is supplied check ownership
      if (typeof userId !== 'undefined' && data.userId !== userId) {
        return reject('Not authorized');
      }
      return resolve(data);
    });
  });
}

function updateNote(db, userId, noteId, note) {
  if (!note || !noteId) {
    return Promise.reject();
  }

  return getNote(db, noteId, userId)
    .then(currentNote => new Promise((resolve, reject) => {
      db
        .collection(CONSTANTS.COLLECTION_NOTES)
        .updateOne({id: noteId}, Object.assign({}, currentNote, note), err => {
          if (err) {
            return reject(err);
          }
          return resolve(CONSTANTS.SUCCESS_RESPONSE);
        });
    }));
}

module.exports = {
  updateNote,
  getNotes,
  addNote
};
```

Add a PUT clause to `src/app.js` and 2 new functions to `src/note.js`.

We use the `getNote` both as an authentication check (to see if the userId owns it) and to return an existing note.

The `updateNote` function will merge the changes of the existing note with the object passed to it.

You should now be able to edit notes in the client (after a deploy and a refresh).

### Deleting notes

**`src/app.js`**

```
...
    case 'DELETE':
      if (!noteId) {
        return respondAndClose(db, callback, 'Missing id parameter', STATUS_CODES.BAD_REQUEST);
      }
      return note.deleteNote(db, userId, noteId)
        .then(res => respondAndClose(db, callback, res))
        .catch(err => respondAndClose(db, callback, err.message, STATUS_CODES.INTERNAL_SERVER_ERROR));
```

**`src/note.js`**

```
...
function deleteNote(db, userId, noteId) {
  if (!noteId) {
    return Promise.reject('Missing note id');
  }

  // Make sure we have access to the note we are trying to delete
  return getNote(db, noteId, userId)
    .then(() => new Promise((resolve, reject) => {
      db
        .collection(CONSTANTS.COLLECTION_NOTES)
        .deleteOne({id: noteId}, err => {
          if (err) {
            return reject(err);
          }
          return resolve(JSON.stringify(CONSTANTS.SUCCESS_RESPONSE));
        });
    }));
}

module.exports = {
  deleteNote,
  updateNote,
  getNotes,
  addNote
};
```

Last up is the ability to delete notes, same procedure here. New switch case and a new function. This time using `deleteOne` from MongoClient.

That's it, you can now create, read, update and delete notes on your shiny new Lambda API.

The example code for this project can be found here: [https://github.com/lambdasync/lambdasync-example-auth0/](https://github.com/lambdasync/lambdasync-example-auth0/)
Comments (0)
No comments yet. Be the first!